Photoprism

November 23, 2024 |


1.Install Photoprism in Windows

Ref: https://docs.photoprism.app/getting-started/docker-compose/#__tabbed_1_5

- Install Docker

$ curl.exe -o install.bat https://dl.photoprism.app/docker/windows/install.bat

install.bat

- Download compose.xml to local

- Run command below where compose.xml stored.

$ docker compose up -d

$ docker compose stop

- Access photoprim: http://localhost:2342/ 

- Enter default user: admin/insecure (Remember change password after login)


Read more…

Proxmox

October 27, 2024 |


1. Install Proxmox

Download: https://www.proxmox.com/en/downloads

How to install Proxmox in Virtual Box: https://getlabsdone.com/how-to-install-proxmox-ve-on-virtualbox-step-by-step/


Note: Hard Disk must be VMDK (Virtual Machine Disk) format. Another type can't show GUI, Virtual only show back screen.

Virtual Box command line:
$ vboxmanage list vms
$ VBoxManage modifyvm <Name Virtual Box> --nested-hw-virt on  // Enable Nested VT-x/AMD-V

Install Promox:
- Select Install Proxmox VE (Graphical) 
- Enter Country and timezone


- Enter password & email

- Enter IP address
- Next and Installing...


is updating...
Read more…

Genymotion Tips

October 01, 2024 |


[Windows]
1. User Account Control Prompt many time when start emulator.

Right click Genymotion in Desktop > Properties > Compatibility > Check Run this program run as Administrator

2. If you can't Drag&Drop file into Emulator, remove Administator.

Read more…

Mikrotik L2TP / IPsec VPN Server Step by Step configuration

August 29, 2024 |


Ref: 

https://www.cloudhosting.lv/eng/faq/Mikrotik-L2TP-IPsec-VPN-Server-Step-by-Step-configuration

How to enable VPN Server in Mikrotik Router

Step 1: PPP > Interface > L2TP Server


Check Enable & Enter IPSec Secret


Step 2: IP> Pool > Add

Make VPN Pool

Enter Name: VPN
Address      : 192.168.10.100-192.168.10.150

Step 3: PPP > Profile


- Make profile


- Enter Name       : VPN
- Local Addresss  : VPN-Pool
- Remote Address: VPN-Pool

- Rate Limit: 20M/20M

Step 4: PPP > Secret > Add


Enter Name        : test
Password            : 12356
Profile                : VPN
Local Address    : 192.168.10.100
Remote Address    : 192.168.10.101

Step 5: Firewall > Filter Rule (Important step)

- Allow port: 1701, 500, 4500
- Chain: input
- Protocol: udp
- Dst Port: 1701, 500, 4500
- Action: Accept


add more:


Final Result:


These rule must be on top another rules.

If you have any question, please send to me: hoquoctri@live.com

Thanks;


Read more…

MacOS A->Z

August 27, 2024 |


1. Install HomeBrew
Ref: https://brew.sh/

$ /bin/bash -c "$(curl -fsSL https://raw.githubusercontent.com/Homebrew/install/HEAD/install.sh)"

If MacOS can't found brew command
$ echo "export PATH=/opt/homebrew/bin:$PATH" >> ~/.zshrc

2. Install NVM (Node Version Management)
You can install vary node version in PC and easy switch between node version

$ brew install nvm
$ nvm --version
$ nvm install --lts // Install Node latest version
$ nvm install <node_version>
$ nvm use <node version>

Note: if nvm command not found, add line below to ./zshrc

source $(brew --prefix nvm)/nvm.sh

3. Install Yarn command

$ brew install yarn

4. How to show NPM Scripts in Visual Studio Code

Go to View > Open View > Select NPM Script

5. Install Many Java Verison in Mac OS

$ /usr/libexec/java_home -V // All Java Installed will show here 

6. Install Many Java Version nin MacOS by SDKMAIN 

Ref : https://sdkman.io/usage

// Download SDK
$ curl -s "https://get.sdkman.io" | bash

// Change SDK Man
$ source "$HOME/.sdkman/bin/sdkman-init.sh"

// Check SDK version
$ sdk version

// List packages
$ sdk list  or sdk list <package_name>

// Install Java
$ sdk install java

$ sdk install java 8.0.42

// Set use special version
$ sdk use scala 3.4.2

// Set default  version
$ sdk default scala 3.4.2

// Check Current version
$ sdk current java


Read more…

React Native on WearOS

August 26, 2024 |


Ref:

https://github.com/fabOnReact/react-native-wear-connectivity?tab=readme-ov-file

I. Create React Native Project on Android

#Remove previous cli
$ npm uninstall -g react-native-cli @react-native-community/cli

#Init project
npx @react-native-community/cli@latest init AwesomeProject

#Edit package.json; Run on Default Port 8081 & Select Device 


#Create Android Simulator

# In Android Simulator > Install Google Watch App/Wear OS App
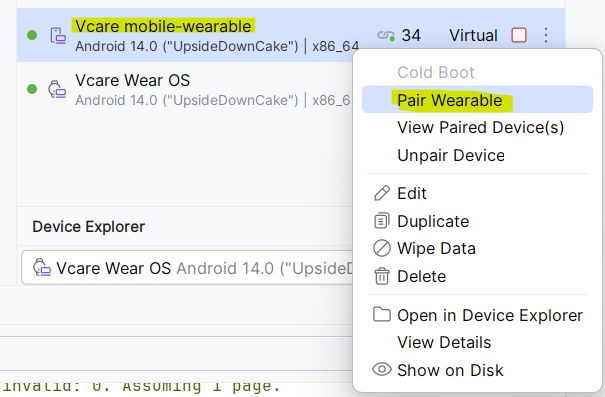
#Paire Wear Devices


- Must open Google Watch app while pair devices and init set up.

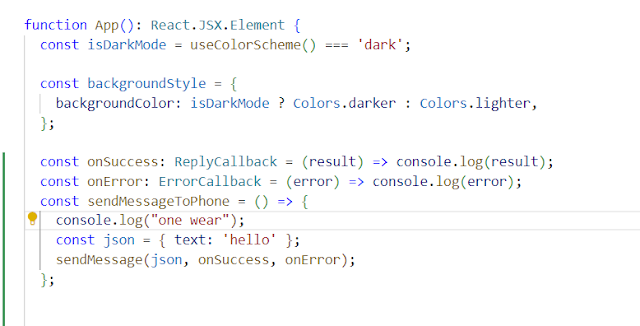
- Code in App.tsx


II. Create React Native Project on WearOS

#Remove previous cli
$ npm uninstall -g react-native-cli @react-native-community/cli

#Init project
npx @react-native-community/cli@latest init AwesomeProject

#Edit package.json , Run on Port 8082 & Select Device 


# Create Wear OS Simulator


- Code in App.tsx


Try test app:

Wear Device:


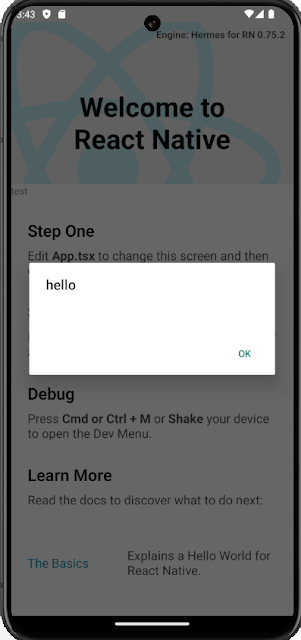
Android device display Alert from Wear Device:


Read more…

MariaDB - Config Galera Cluster in RockyOS

April 16, 2024 |


MariaDB - Config Galera Cluster in RockyOS

I. Install MariaDB

Ref: 

1. https://www.digitalocean.com/community/tutorials/how-to-install-mariadb-on-centos-7

2. https://centlinux.com/install-mariadb-galera-cluster-on-linux/

II. Install Galera Cluster

-- Install Galera Pacakges

$ dnf -y install mariadb-server-galera 

-- Open firewall 

$ $firewall-cmd --add-service=mysql

$ firewall-cmd --add-port={3306/tcp,4567/tcp,4568/tcp,4444/tcp}

$ firewall-cmd --runtime-to-permanent 

-- Config Node as below

$ vi /etc/my.cnf.d/galera.cnf 


Repeat again another node

-- Run Galera Cluster
$ galera_new_cluster

-- Stop/Start Maria Server again. If not, we can reboot servers

-- Check Galera work or not

$mysql -uroot -p
SQL: 

- SHOW STATUS LIKE 'wsrep_%'" // Show all parameter

- show global status like 'wsrep_cluster_size'; /. Show Cluster Node Number

We can test that by creating a new database in node #1 and checking on node #2.


is updating... 


Read more…

[TypeScript] - Basic to Advance

April 14, 2024 |


I. Basic

Data type:
- boolean/number/string (primitives ): meaning same another programming language.
- bigint/symbol

Assignment:
let myName: string = "Ho Quoc Tri"; //Explicit Type
let myName            = "Ho Quoc Tri"; // Implicit, same javascript
let myName: any    = "Ho Quoc Tri"; // Type not check, not throw error when assign wrong type
let myName: unknown = " Ho Quoc Tri"; // Same Any but safer than any.

===========================
Typescript - Array
const animals : string [] = [];
animals.push("dog");

-- Create Const Array, cannot change
const animals: read only string[] = ["dog"];

===========================
Typescript - Tuple
let attributeAnimals : [number, string, boolean];
attributeAnimals = [1, "Dog", false];

--Read Only
const attributeAnimals : readonly [number, string, boolean] = [1, "Dog", false];

===========================
Typescript - Object type

const animals : {id: number, name: string, age: number} =  {
    id: 1,
    name : "dogs",
    age : 10
}

-- Optional Property
const animals : {id: number, name: string, age?: number} =  {
    id: 1,
    name : "dogs"
}
animals .age = 10;

===========================
Typescript - Enum

//Default enum, first value to 0 and add 1 to each additional value
enum EWEEK {
    MONDAY,                 // default value = 0
    TUESDAY,             // default value = 1
    WEDNESDAY,    // default value = 2
    THURSDAY,     // default value = 3
    FRIDAY,         // default value = 4
    SATURDAY, // default value = 5
    SUNDAY     // default value = 6
}

// Full initialize value
enum StatusCodes {
  NotFound = 404,
  Success = 200,
  Accepted = 202,
  BadRequest = 400
}

===========================
Typescript - Type Alias
We can define primitive type or object, array.

type AnimalAge: number;
type AnimalName: string;
type AnimalStruct  = {
    age : AnimalAge,
    name: AnimalName
}

let age : AnimalAge          = 10 ;
let name: AnimalName     = "Dogs";
let dogs = {
    age : 10,
    name: "Dogs"
}

===========================
Typescript - Type Interface
Interface same Type except only apply to Object
interface Animal = {
    age : number,
    name : string
}

let dog : Animal = {
    age : 10,
    name : "Dog"
}

//Extend interface
interface Fish extends Animal  {
    swing: boolean
}

const fish: Fish = {
    age : 1,
    name: "Fish",
    swing: true
}

===========================
Typescript - Union Type

let age : string | number;

function printAge(age: string | number) {

}

===========================
Typescript - Casting

Casting by "as"
let x: unknown = 'hello';
console.log((x as string).length);
-----------
Casting by "<>"
let x: unknown = 'hello';
console.log((<string>x).length);

===========================
Typescript - Classes

class Animal {
    private id : number;
    protected name : string;
    public address : string;

    public constructor (id : number) {
        this.id = id;
    }
}

const dogs = new Animal(1);
dogs.name = "Dog";

-----------
interface ISound {
    makeSound : () => string;
}

class Animal implements ISound {
    makeSound (): number {
        return "Gau Gau";
    }
}

-----------
Same JAVA meaning :

abstract class Animal {
  public abstract makeSound: string;

}

class Dog extends Animal {
  public constructor( ) {
    super( );
  }

  public makeSound(): string{
          return "Gau Gau";
  }
}

===========================
Typescript - Generics

-- Generics with Function: 

function createClazz:<N, S>(numberStudent : <N>, className: <S>) {
    return [numberStudent , className];
}

-- Generics with Classes
class NamedValue <T> {

  private _value: T | undefined;

}

-- Generics with Type
type AgeAnimal<T> = { age: T };

const age: AgeAnimal<number> = { value: 2 };

-- Generics with a default value. 
We can set a default value for generic

class NamedValue <T = string> {
  private _value: T | undefined;
}

-- Generics with extends
function createLoggedPair<S extends string | number, T extends string | number>(v1: S, v2: T): [S, T] {
  console.log(`creating pair: v1='${v1}', v2='${v2}'`);
  return [v1, v2];
}
===========================
Typescript - TypeOf

Check DataType

Type Predicate
string         typeof s === "string"
number         typeof n === "number"
boolean         typeof b === "boolean"
undefined         typeof undefined === "undefined"
function             typeof f === "function"
array         Array.isArray(a)


===========================
Typescript - Utility

-- Partial changes all the properties in an object to be optional.
interface Animal {
    id: number,
    age: number
}

let animal: Partial<Animal> = {};
animal.id=1;
animal.age=10;

-- Required changes all the properties in an object to be required.
interface Animal {
    id: number,
    age: number,
    name?: string
}

let animal: Required<Animal> = {};
animal.id=1;
animal.age=10;

II. TS Conversion Naming

Ref: 

2.1 - Use meaningful variable names.

//BAD
function isBetween(a1: number, a2: number, a3: number): boolean {
  return a2 <= a1 && a1 <= a3;
}
//GOOD
function isBetween(value: number, left: number, right: number): boolean {
   return left <= value && value <= right;
 }

2.2 - Use pronounceable variable names
//BAD
class Subs {
  ...
}
//GOOD
class Subscription {
... }
2.3 - Avoid mental mapping
//BAD
const u = getUser();
const s = getSubscription();
const t = charge(u, s);
//GOOD
const user = getUser();
const subscription = getSubscription();
const transaction = charge(user, subscription);
2.3 - Don't add unneed context
//BAD
type Car = {
  carMake: string;
  carModel: string;
carColor: string; }
//GOOD
type Car = {
  make: string;
  model: string;
  color: string;
}

2.4 - Naming Convention
- Use camelCase for variable and function names.
- Use camelCase of class members, interface members, methods and methods parameters.
- Use PascalCase for class names and interface names.
// BAD
class foo { }
//GOOD
class Foo { }
- Use PascalCase for enums and camelCase for enum members.
//BAD
enum notificationTypes {
  ... 
}
//GOOD
enum NotificationTypes {
  ... 
}
2.4 - Naming Boolean
- Don't use negative names for boolean variables.
// BAD
const isNotEnabled = true;
// GOOD
const isEnabled = true;
- A prefix like is, are, or has helps every developer to distinguish a boolean from another variable by just looking at it
//BAD
const enabled = true;
//GOOD
const isEnabled = true;
2.5 - Use typescript aliases
-- This will avoid long relative paths when doing imports.
// BAD
import { UserService } from '../../../services/UserService';
// GOOD
import { UserService } from '@services/UserService';
2.6 - Component Structure

Use the following component structure:

  1. Input properties (i.e. @Input() product: OrderItemModel)
  2. Output properties (i.e. @Output() changeMade = new EventEmitter(true))
  3. ViewChild / ViewChildren (i.e. @ViewChild(ChildDirective) child!: ChildDirective)
  4. HostBinding properties (i.e. @HostBinding('class.valid') get valid() { return this.control.valid; })
  5. data members (i.e. public isBeingRemoved = false)
  6. constructor
  7. lifecycle hooks (following their execution order)
  8. getters/setters
  9. event handlers
  10. other methods
Use the following component accessors order:
  1. private
  2. protected
  3. public

III. TS project

-- Install Typescript Lib
$ npm i typescript --save-dev

-- Init TS Project
$ npx tsc --init

-- Create TS File
$ index.ts

-- Compile TS file => JS File (Crt + ` : to open terminal)
$ npx tsc index.ts
or 
$ tsc index.ts 


TS file compiles to JS File:


In Visual Studio Code, click on the TS file and CRT + SHIFT + B > Select tsconfig.json > File will compile.


If you want to set default compile config: CRT + SHIFT + B > Select Setting icon ts:build > edit task.json in .vscode:


Custom Compile output folder:
- tsconfig.json


To easy run in VS, we create a script in package.json:
{
  "scripts": {
    "Compile-TS": "tsc -p tsconfig.json",
    "Run-index": "cd build && node index.js"
  },
  "devDependencies": {
    "typescript": "^5.4.5"
  }
}


is updating... 


Read more…

Install Bugzilla on CentOS/Rocky OS

April 10, 2024 |


Install Bugzilla on CentOS 8/Rocky 

I. Install Packages

Ref: 


Step 1: Install EPEL packages:

Ref: https://docs.fedoraproject.org/en-US/epel/

$ dnf config-manager --set-enabled crb
$ dnf install epel-release

Step 2: Install bugzilla required packages:

$ dnf install git httpd httpd-devel mariadb-devel gcc mariadb-server mod_perl mod_perl-devel 'perl(autodie)' 'perl(CGI)' 'perl(Date::Format)' 'perl(DateTime)' 'perl(DateTime::TimeZone)' 'perl(DBI)' 'perl(DBD::mysql)' 'perl(DBIx::Connector)' 'perl(Digest::SHA)' 'perl(Email::MIME)' 'perl(Email::Sender)' 'perl(fields)' 'perl(JSON::XS)' 'perl(List::MoreUtils)' 'perl(Math::Random::ISAAC)' 'perl(Memoize)' 'perl(Safe)' 'perl(Template)' 'perl(URI)'

$ dnf install gd-devel graphviz patchutils 'perl(Apache2::SizeLimit)' 'perl(Authen::Radius)' 'perl(Authen::SASL)' 'perl(Cache::Memcached)' 'perl(Encode)' 'perl(Encode::Detect)' 'perl(File::Copy::Recursive)' 'perl(File::MimeInfo::Magic)' 'perl(File::Which)' 'perl(GD)' 'perl(GD::Graph)' 'perl(GD::Text)' 'perl(HTML::Parser)' 'perl(HTML::Scrubber)' 'perl(IO::Scalar)' 'perl(JSON::RPC)' 'perl(LWP::UserAgent)' 'perl(MIME::Parser)' 'perl(mod_perl2)' 'perl(Net::LDAP)' 'perl(Net::SMTP::SSL)' 'perl(SOAP::Lite)' 'perl(Test::Taint)' 'perl(XMLRPC::Lite)' 'perl(XML::Twig)'

Step 3: Download and install bugzilla package
$ cd /var/www/html/
$ git clone --branch release-X.X-stable https://github.com/bugzilla/bugzilla
Ex: X.X is version

Step 4: Install Perl required Package
$ cd /var/www/html/bugzilla/ && ./install-module.pl Chart::Lines Daemon::Generic Email::Reply HTML::FormatText::WithLinks PatchReader Template::Plugin::GD::Image TheSchwartz

$ ./install-module.pl --all // install all perl module
$./checksetup.pl --check-modules // check require module

Some problems when install:

Problems #1: Can't locate CPAN.pm in @INC
Solution:
$ yum -y install perl-CPAN

==============
Problems #2: No POSTGRES_HOME defined, cannot find automatically

No 'Makefile' created  TURNSTEP/DBD-Pg-3.18.0.tar.gz
/usr/bin/perl Makefile.PL  LIB="/var/www/html/bugzilla/lib" INSTALLMAN1DIR="/var/www/html/bugzilla/lib/man/man1" INSTALLMAN3DIR="/var/www/html/bugzilla/lib/man/man3" INSTALLBIN="/var/www/html/bugzilla/lib/bin" INSTALLSCRIPT="/var/www/html/bugzilla/lib/bin" INSTALLDIRS=perl -- NOT OK

Solution:
$ yum install postgresql-devel

II. Config Apache

# Edit config file
$ /etc/httpd/conf/httpd.conf
 and follow Bugzilla Guide 

III. Install Mariab DB 

Ref: https://bugzilla.readthedocs.io/en/latest/installing/mysql.html#mysql

How to Install Mariab DB : https://www.digitalocean.com/community/tutorials/how-to-install-mariadb-on-centos-7

$mysql -uroot -p

-- Create DB
CREATE DATABASE IF NOT EXISTS bugs CHARACTER SET = ‘utf8’;


-- Create user
GRANT SELECT, INSERT,
UPDATE, DELETE, INDEX, ALTER, CREATE, LOCK TABLES,
CREATE TEMPORARY TABLES, DROP, REFERENCES ON bugs.*
TO bugs@localhost IDENTIFIED BY 'YOUR_STRONG_PASSWORD';

FLUSH PRIVILEGES;

-- Check user created or not
SELECT user FROM mysql.user;

Change MariaDB Configuration:

// Allow Large Attachments and Many Comments
$ /etc/my.cnf.d/mariadb-server.cnf

[mysqld]
# Allow packets up to 16M
max_allowed_packet=16M


// Allow Small Words in Full-Text Indexes
[mysqld]
# Allow small words in full-text indexes
ft_min_word_len=2


Restart MariaDB
$ systemctl restart mariadb

-- Permit Attachments Table to Grow Beyond 4GB (DO AFTER INSTALL BUGZILLA)
$mysql -uroot -p

MariaDB [(none)]> use bugs;
Database changed
MariaDB [bugs]> ALTER TABLE attachments AVG_ROW_LENGTH=1000000, MAX_ROWS=20000;


III. Setup Buzilla Config


$ cd  /var/www/html/bugzilla/
$ ./checksetup.pl
Check output. Bugzilla will generate localconfig file


$ vi localconfig

You will need to check/change $db_driver and $db_pass. 
$db_driver can be either mysql, Pg (PostgreSQL), Oracle or Sqlite. All values are case sensitive.

// Run setup again
$ ./checksetup.pl

// Enter your administrator information


IV - Test Bugzilla

$ cd /var/www/html/bugzilla
$ ./testserver.pl http://localhost/

or access bugzilla front page in web browser.

Note: Must allow port 80 in firewall.


V - Bugzilla Basic Setup

4.1 - Access Bugzilla via : http://<your_ip>/bugzilla/ 

4.2 - Config Email

Administrator > Parameter > Email menu :


    The domain name of the server (Parameter: smtpserver)
    The username and password to use (Parameters: smtp_username and smtp_password)
    Whether the server uses SSL (Parameter: smtp_ssl)
    The address you should be sending mail ‘From’ (Parameter: mailfrom)


is updating...


Read more…