[TypeScript] - Basic to Advance

April 14, 2024 |


I. Basic

Data type:
- boolean/number/string (primitives ): meaning same another programming language.
- bigint/symbol

Assignment:
let myName: string = "Ho Quoc Tri"; //Explicit Type
let myName            = "Ho Quoc Tri"; // Implicit, same javascript
let myName: any    = "Ho Quoc Tri"; // Type not check, not throw error when assign wrong type
let myName: unknown = " Ho Quoc Tri"; // Same Any but safer than any.

===========================
Typescript - Array
const animals : string [] = [];
animals.push("dog");

-- Create Const Array, cannot change
const animals: read only string[] = ["dog"];

===========================
Typescript - Tuple
let attributeAnimals : [number, string, boolean];
attributeAnimals = [1, "Dog", false];

--Read Only
const attributeAnimals : readonly [number, string, boolean] = [1, "Dog", false];

===========================
Typescript - Object type

const animals : {id: number, name: string, age: number} =  {
    id: 1,
    name : "dogs",
    age : 10
}

-- Optional Property
const animals : {id: number, name: string, age?: number} =  {
    id: 1,
    name : "dogs"
}
animals .age = 10;

===========================
Typescript - Enum

//Default enum, first value to 0 and add 1 to each additional value
enum EWEEK {
    MONDAY,                 // default value = 0
    TUESDAY,             // default value = 1
    WEDNESDAY,    // default value = 2
    THURSDAY,     // default value = 3
    FRIDAY,         // default value = 4
    SATURDAY, // default value = 5
    SUNDAY     // default value = 6
}

// Full initialize value
enum StatusCodes {
  NotFound = 404,
  Success = 200,
  Accepted = 202,
  BadRequest = 400
}

===========================
Typescript - Type Alias
We can define primitive type or object, array.

type AnimalAge: number;
type AnimalName: string;
type AnimalStruct  = {
    age : AnimalAge,
    name: AnimalName
}

let age : AnimalAge          = 10 ;
let name: AnimalName     = "Dogs";
let dogs = {
    age : 10,
    name: "Dogs"
}

===========================
Typescript - Type Interface
Interface same Type except only apply to Object
interface Animal = {
    age : number,
    name : string
}

let dog : Animal = {
    age : 10,
    name : "Dog"
}

//Extend interface
interface Fish extends Animal  {
    swing: boolean
}

const fish: Fish = {
    age : 1,
    name: "Fish",
    swing: true
}

===========================
Typescript - Union Type

let age : string | number;

function printAge(age: string | number) {

}

===========================
Typescript - Casting

Casting by "as"
let x: unknown = 'hello';
console.log((x as string).length);
-----------
Casting by "<>"
let x: unknown = 'hello';
console.log((<string>x).length);

===========================
Typescript - Classes

class Animal {
    private id : number;
    protected name : string;
    public address : string;

    public constructor (id : number) {
        this.id = id;
    }
}

const dogs = new Animal(1);
dogs.name = "Dog";

-----------
interface ISound {
    makeSound : () => string;
}

class Animal implements ISound {
    makeSound (): number {
        return "Gau Gau";
    }
}

-----------
Same JAVA meaning :

abstract class Animal {
  public abstract makeSound: string;

}

class Dog extends Animal {
  public constructor( ) {
    super( );
  }

  public makeSound(): string{
          return "Gau Gau";
  }
}

===========================
Typescript - Generics

-- Generics with Function: 

function createClazz:<N, S>(numberStudent : <N>, className: <S>) {
    return [numberStudent , className];
}

-- Generics with Classes
class NamedValue <T> {

  private _value: T | undefined;

}

-- Generics with Type
type AgeAnimal<T> = { age: T };

const age: AgeAnimal<number> = { value: 2 };

-- Generics with a default value. 
We can set a default value for generic

class NamedValue <T = string> {
  private _value: T | undefined;
}

-- Generics with extends
function createLoggedPair<S extends string | number, T extends string | number>(v1: S, v2: T): [S, T] {
  console.log(`creating pair: v1='${v1}', v2='${v2}'`);
  return [v1, v2];
}
===========================
Typescript - TypeOf

Check DataType

Type Predicate
string         typeof s === "string"
number         typeof n === "number"
boolean         typeof b === "boolean"
undefined         typeof undefined === "undefined"
function             typeof f === "function"
array         Array.isArray(a)


===========================
Typescript - Utility

-- Partial changes all the properties in an object to be optional.
interface Animal {
    id: number,
    age: number
}

let animal: Partial<Animal> = {};
animal.id=1;
animal.age=10;

-- Required changes all the properties in an object to be required.
interface Animal {
    id: number,
    age: number,
    name?: string
}

let animal: Required<Animal> = {};
animal.id=1;
animal.age=10;

II. TS Conversion Naming

Ref: 

2.1 - Use meaningful variable names.

//BAD
function isBetween(a1: number, a2: number, a3: number): boolean {
  return a2 <= a1 && a1 <= a3;
}
//GOOD
function isBetween(value: number, left: number, right: number): boolean {
   return left <= value && value <= right;
 }

2.2 - Use pronounceable variable names
//BAD
class Subs {
  ...
}
//GOOD
class Subscription {
... }
2.3 - Avoid mental mapping
//BAD
const u = getUser();
const s = getSubscription();
const t = charge(u, s);
//GOOD
const user = getUser();
const subscription = getSubscription();
const transaction = charge(user, subscription);
2.3 - Don't add unneed context
//BAD
type Car = {
  carMake: string;
  carModel: string;
carColor: string; }
//GOOD
type Car = {
  make: string;
  model: string;
  color: string;
}

2.4 - Naming Convention
- Use camelCase for variable and function names.
- Use camelCase of class members, interface members, methods and methods parameters.
- Use PascalCase for class names and interface names.
// BAD
class foo { }
//GOOD
class Foo { }
- Use PascalCase for enums and camelCase for enum members.
//BAD
enum notificationTypes {
  ... 
}
//GOOD
enum NotificationTypes {
  ... 
}
2.4 - Naming Boolean
- Don't use negative names for boolean variables.
// BAD
const isNotEnabled = true;
// GOOD
const isEnabled = true;
- A prefix like is, are, or has helps every developer to distinguish a boolean from another variable by just looking at it
//BAD
const enabled = true;
//GOOD
const isEnabled = true;
2.5 - Use typescript aliases
-- This will avoid long relative paths when doing imports.
// BAD
import { UserService } from '../../../services/UserService';
// GOOD
import { UserService } from '@services/UserService';
2.6 - Component Structure

Use the following component structure:

  1. Input properties (i.e. @Input() product: OrderItemModel)
  2. Output properties (i.e. @Output() changeMade = new EventEmitter(true))
  3. ViewChild / ViewChildren (i.e. @ViewChild(ChildDirective) child!: ChildDirective)
  4. HostBinding properties (i.e. @HostBinding('class.valid') get valid() { return this.control.valid; })
  5. data members (i.e. public isBeingRemoved = false)
  6. constructor
  7. lifecycle hooks (following their execution order)
  8. getters/setters
  9. event handlers
  10. other methods
Use the following component accessors order:
  1. private
  2. protected
  3. public

III. TS project

-- Install Typescript Lib
$ npm i typescript --save-dev

-- Init TS Project
$ npx tsc --init

-- Create TS File
$ index.ts

-- Compile TS file => JS File (Crt + ` : to open terminal)
$ npx tsc index.ts
or 
$ tsc index.ts 


TS file compiles to JS File:


In Visual Studio Code, click on the TS file and CRT + SHIFT + B > Select tsconfig.json > File will compile.


If you want to set default compile config: CRT + SHIFT + B > Select Setting icon ts:build > edit task.json in .vscode:


Custom Compile output folder:
- tsconfig.json
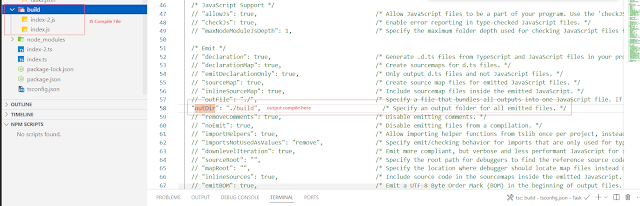

To easy run in VS, we create a script in package.json:
{
  "scripts": {
    "Compile-TS": "tsc -p tsconfig.json",
    "Run-index": "cd build && node index.js"
  },
  "devDependencies": {
    "typescript": "^5.4.5"
  }
}


is updating... 


Install Bugzilla on CentOS/Rocky OS/Windows

April 10, 2024 |


Install Bugzilla on CentOS 8/Rocky 

I. Install Packages

Ref: 


Step 1: Install EPEL packages:

Ref: https://docs.fedoraproject.org/en-US/epel/

$ dnf config-manager --set-enabled crb
$ dnf install epel-release

Step 2: Install bugzilla required packages:

$ dnf install git httpd httpd-devel mariadb-devel gcc mariadb-server mod_perl mod_perl-devel 'perl(autodie)' 'perl(CGI)' 'perl(Date::Format)' 'perl(DateTime)' 'perl(DateTime::TimeZone)' 'perl(DBI)' 'perl(DBD::mysql)' 'perl(DBIx::Connector)' 'perl(Digest::SHA)' 'perl(Email::MIME)' 'perl(Email::Sender)' 'perl(fields)' 'perl(JSON::XS)' 'perl(List::MoreUtils)' 'perl(Math::Random::ISAAC)' 'perl(Memoize)' 'perl(Safe)' 'perl(Template)' 'perl(URI)'

$ dnf install gd-devel graphviz patchutils 'perl(Apache2::SizeLimit)' 'perl(Authen::Radius)' 'perl(Authen::SASL)' 'perl(Cache::Memcached)' 'perl(Encode)' 'perl(Encode::Detect)' 'perl(File::Copy::Recursive)' 'perl(File::MimeInfo::Magic)' 'perl(File::Which)' 'perl(GD)' 'perl(GD::Graph)' 'perl(GD::Text)' 'perl(HTML::Parser)' 'perl(HTML::Scrubber)' 'perl(IO::Scalar)' 'perl(JSON::RPC)' 'perl(LWP::UserAgent)' 'perl(MIME::Parser)' 'perl(mod_perl2)' 'perl(Net::LDAP)' 'perl(Net::SMTP::SSL)' 'perl(SOAP::Lite)' 'perl(Test::Taint)' 'perl(XMLRPC::Lite)' 'perl(XML::Twig)'

Step 3: Download and install bugzilla package
$ cd /var/www/html/
$ git clone --branch release-X.X-stable https://github.com/bugzilla/bugzilla
Ex: X.X is version

Step 4: Install Perl required Package
$ cd /var/www/html/bugzilla/ && ./install-module.pl Chart::Lines Daemon::Generic Email::Reply HTML::FormatText::WithLinks PatchReader Template::Plugin::GD::Image TheSchwartz

$ ./install-module.pl --all // install all perl module
$./checksetup.pl --check-modules // check require module

Some problems when install:

Problems #1: Can't locate CPAN.pm in @INC
Solution:
$ yum -y install perl-CPAN

==============
Problems #2: No POSTGRES_HOME defined, cannot find automatically

No 'Makefile' created  TURNSTEP/DBD-Pg-3.18.0.tar.gz
/usr/bin/perl Makefile.PL  LIB="/var/www/html/bugzilla/lib" INSTALLMAN1DIR="/var/www/html/bugzilla/lib/man/man1" INSTALLMAN3DIR="/var/www/html/bugzilla/lib/man/man3" INSTALLBIN="/var/www/html/bugzilla/lib/bin" INSTALLSCRIPT="/var/www/html/bugzilla/lib/bin" INSTALLDIRS=perl -- NOT OK

Solution:
$ yum install postgresql-devel

II. Config Apache

# Edit config file
$ /etc/httpd/conf/httpd.conf
 and follow Bugzilla Guide 

III. Install Mariab DB 

Ref: https://bugzilla.readthedocs.io/en/latest/installing/mysql.html#mysql

How to Install Mariab DB : https://www.digitalocean.com/community/tutorials/how-to-install-mariadb-on-centos-7

$mysql -uroot -p

-- Create DB
CREATE DATABASE IF NOT EXISTS bugs CHARACTER SET = ‘utf8’;


-- Create user
GRANT SELECT, INSERT,
UPDATE, DELETE, INDEX, ALTER, CREATE, LOCK TABLES,
CREATE TEMPORARY TABLES, DROP, REFERENCES ON bugs.*
TO bugs@localhost IDENTIFIED BY 'YOUR_STRONG_PASSWORD';

FLUSH PRIVILEGES;

-- Check user created or not
SELECT user FROM mysql.user;

Change MariaDB Configuration:

// Allow Large Attachments and Many Comments
$ /etc/my.cnf.d/mariadb-server.cnf

[mysqld]
# Allow packets up to 16M
max_allowed_packet=16M


// Allow Small Words in Full-Text Indexes
[mysqld]
# Allow small words in full-text indexes
ft_min_word_len=2


Restart MariaDB
$ systemctl restart mariadb

-- Permit Attachments Table to Grow Beyond 4GB (DO AFTER INSTALL BUGZILLA)
$mysql -uroot -p

MariaDB [(none)]> use bugs;
Database changed
MariaDB [bugs]> ALTER TABLE attachments AVG_ROW_LENGTH=1000000, MAX_ROWS=20000;


III. Setup Buzilla Config


$ cd  /var/www/html/bugzilla/
$ ./checksetup.pl
Check output. Bugzilla will generate localconfig file


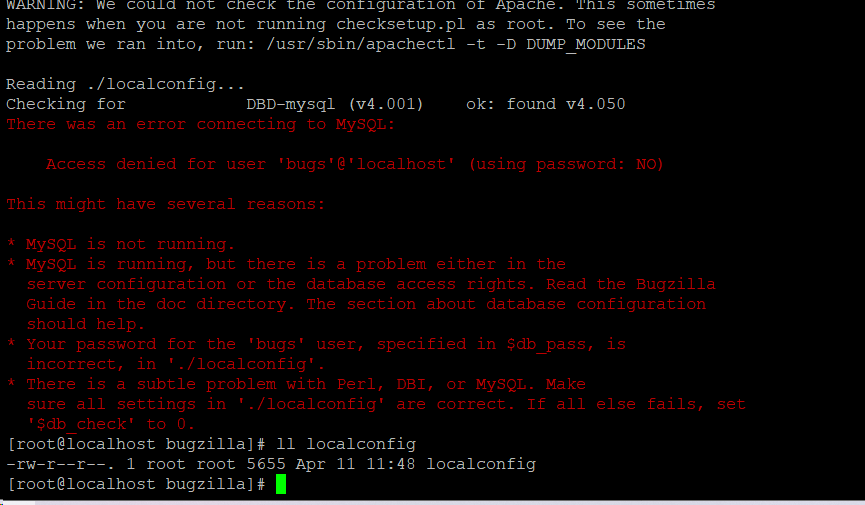
$ vi localconfig

You will need to check/change $db_driver and $db_pass. 
$db_driver can be either mysql, Pg (PostgreSQL), Oracle or Sqlite. All values are case sensitive.

// Run setup again
$ ./checksetup.pl

// Enter your administrator information


IV - Test Bugzilla

$ cd /var/www/html/bugzilla
$ ./testserver.pl http://localhost/

or access bugzilla front page in web browser.

Note: Must allow port 80 in firewall.


V - Bugzilla Basic Setup

4.1 - Access Bugzilla via : http://<your_ip>/bugzilla/ 

4.2 - Config Email

Administrator > Parameter > Email menu :


    The domain name of the server (Parameter: smtpserver)
    The username and password to use (Parameters: smtp_username and smtp_password)
    Whether the server uses SSL (Parameter: smtp_ssl)
    The address you should be sending mail ‘From’ (Parameter: mailfrom)

[24.04.2026] 
- If you want to deploy Bugzilla in Windows please consider technical below:
1. Git
2. Strawberry Perl
3. PostgreSQL
4. IIS with CGI

Step 1 — Install Strawberry Perl

  1. Download from https://strawberryperl.com/
  2. Install to C:\Strawberry (avoid paths with spaces)
  3. Log out and back in to apply PATH changes
  4. Verify: open Command Prompt and run perl -v

Step 2 — Install PostgreSQL

  1. Download from https://www.postgresql.org/download/windows/
  2. Run the installer — note the superuser password you set
  3. Default port is 5432 — leave it as-is
  4. After installation, open pgAdmin or the psql shell and create the Bugzilla database:
CREATE USER bugs WITH PASSWORD 'your_password';
CREATE DATABASE bugs OWNER bugs ENCODING 'UTF8';
GRANT ALL PRIVILEGES ON DATABASE bugs TO bugs;

Step 3 — Enable IIS with CGI

  1. Go to Control Panel → Programs → Turn Windows features on or off
  2. Expand Internet Information Services → World Wide Web Services → Application Development Features
  3. Check ✅ CGI, then click OK
  4. Open IIS Manager by running inetmgr

Step 4 — Download Bugzilla

  1. Go to https://www.bugzilla.org/download/ and get the latest 5.2.x release
  2. Extract to C:\Bugzilla

Step 5 — Install Perl Modules

Open Command Prompt as Administrator, go to C:\Bugzilla, and run:

perl install-module.pl --all

Step 6 — Configure localconfig

Run checksetup.pl once to generate the config file:

cd C:\Bugzilla
perl checksetup.pl

It will create localconfig. Open it and set your PostgreSQL details:

$db_driver = 'Pg';            # PostgreSQL driver
$db_host   = 'localhost';
$db_port   = '5432';
$db_name   = 'bugs';
$db_user   = 'bugs';
$db_pass   = 'your_password';

Step 7 — Run checksetup.pl to Build the Database

Run it again — this time it creates all tables and prompts for an admin account:

perl checksetup.pl

Step 8 — Configure IIS

8a — Create the Application

  1. Open IIS Manager (inetmgr)
  2. Expand Sites → Default Web Site
  3. Right-click → Add Application
    • Alias: bugzilla
    • Physical Path: C:\Bugzilla
  4. Click OK

8b — Set Default Document

  1. Click the bugzilla application
  2. Double-click Default Document
  3. Click Add → enter index.cgi
  4. Remove all other default documents for this application

8c — Add CGI Handler Mappings

Click the bugzilla application → double-click Handler MappingsAdd Script Map (do this twice):

Mapping 1 — .cgi files:

FieldValue
Request path*.cgi
ExecutableC:\Strawberry\perl\bin\perl.exe -T "%s" %s
NamePerl CGI

Click Yes when asked to allow the ISAPI extension.

Mapping 2 — remove any existing .pl mapping (if present from a prior ActivePerl install), as .pl files should not be served directly via IIS in Bugzilla.

8d — Set Application Pool

  1. Go to Application Pools
  2. Find the pool used by your Bugzilla app
  3. Set .NET CLR Version to No Managed Code
  4. Set Identity to a user with read access to C:\Bugzilla


[NoIp] - Install NoIp Client In Linux Servers

February 21, 2024 |


=========================================================================

1. Install NoIp Client

    $ cd /usr/local/src

    $ wget http://www.no-ip.com/client/linux/noip-duc-linux.tar.gz

    $ tar xzf noip-duc-linux.tar.gz

    $ cd noip-2.1.9-1

    $ make

    $ make install

2. To Configure the Client

$ /usr/local/bin/noip2 -C

You should create DDNS keys for each domain or group domain.

Enter Username: <Enter user name of a domain or username of a group domain>
Enter Password
Enter Domain: Enter a domain or a list of domain (if group)

3. Start/Stop NoIp Client

$ systemctl start noip

$ systemctl stop noip

is updating


Spring + Thymleaf

January 25, 2024 |


SPRING + Thymeleaf

==============================================================
Basic Setup
Eclipse


Spring initializr:
Ref: https://start.spring.io/


Project structures:


build.gradle

implementation 'org.springframework.boot:spring-boot-starter-thymeleaf'

implementation 'org.springframework.boot:spring-boot-starter-web'

implementation 'org.springframework.boot:spring-boot-starter-web-services'

testImplementation 'org.springframework.boot:spring-boot-starter-test'


SpringWebConfig:

@Configuration

@EnableWebMvc

@ComponentScan

public class SpringWebConfig implements WebMvcConfigurer , ApplicationContextAware {

private static final String[] CLASSPATH_RESOURCE_LOCATIONS = {

"classpath:/META-INF/resources/", "classpath:/resources/",

"classpath:/static/", "classpath:/public/" };

private ApplicationContext applicationContext;


public SpringWebConfig() {

}


@Override

public void setApplicationContext(ApplicationContext applicationContext) throws BeansException {

this.applicationContext = applicationContext;

}

/* ******************************************************************* */

/* GENERAL CONFIGURATION ARTIFACTS */

/* Static Resources, i18n Messages, Formatters (Conversion Service) */

/* ******************************************************************* */

@Override

public void addResourceHandlers(final ResourceHandlerRegistry registry) {

registry.addResourceHandler("/**")

.addResourceLocations(CLASSPATH_RESOURCE_LOCATIONS);

//registry.addResourceHandler("/images/**").addResourceLocations("/images/");

//registry.addResourceHandler("/css/**").addResourceLocations("/css/");

//registry.addResourceHandler("/js/**").addResourceLocations("/js/");

}


@Bean

public ResourceBundleMessageSource messageSource() {

ResourceBundleMessageSource messageSource = new ResourceBundleMessageSource();

messageSource.setBasename("Messages");

return messageSource;

}


@Override

public void addFormatters(final FormatterRegistry registry) {

//registry.addFormatter(varietyFormatter());

registry.addFormatter(dateFormatter());

}


@Bean

public DateFormatter dateFormatter() {

return new DateFormatter();

}


/* **************************************************************** */

/* THYMELEAF-SPECIFIC ARTIFACTS */

/* TemplateResolver <- TemplateEngine <- ViewResolver */

/* **************************************************************** */


@Bean

public SpringResourceTemplateResolver templateResolver(){

// SpringResourceTemplateResolver automatically integrates with Spring's own

// resource resolution infrastructure, which is highly recommended.

SpringResourceTemplateResolver templateResolver = new SpringResourceTemplateResolver();

templateResolver.setApplicationContext(this.applicationContext);

templateResolver.setPrefix("classpath:/templates/");

templateResolver.setSuffix(".html");

// HTML is the default value, added here for the sake of clarity.

templateResolver.setTemplateMode(TemplateMode.HTML);

// Template cache is true by default. Set to false if you want

// templates to be automatically updated when modified.

templateResolver.setCacheable(true);

return templateResolver;

}


@Bean

public SpringTemplateEngine templateEngine(){

// SpringTemplateEngine automatically applies SpringStandardDialect and

// enables Spring's own MessageSource message resolution mechanisms.

SpringTemplateEngine templateEngine = new SpringTemplateEngine();

templateEngine.setTemplateResolver(templateResolver());

// Enabling the SpringEL compiler with Spring 4.2.4 or newer can

// speed up execution in most scenarios, but might be incompatible

// with specific cases when expressions in one template are reused

// across different data types, so this flag is "false" by default

// for safer backwards compatibility.

templateEngine.setEnableSpringELCompiler(true);

return templateEngine;

}


@Bean

public ThymeleafViewResolver viewResolver(){

ThymeleafViewResolver viewResolver = new ThymeleafViewResolver();

viewResolver.setTemplateEngine(templateEngine());

return viewResolver;

}

}


Include javascript to html file:
<script type="text/javascript" th:src="@{/color-modes.js}"></script>


Include css to html file:
<link th:href="@{/styles/cssandjs/main.css}" rel="stylesheet" />

Auto Reload HTML Template:
setCaheable is true or fall


==============================================================
Build and Deploy
1. Build to war file

build.gradle:

gradle.properties: (if you want to set specific JDK)

Run Gradle to build:
$ gradlew build

You can see in build\libs

==============================================================
Tips:
1. Img cannot load in Tomcat.
HTML Native:
<img class="mb-4" src="/vcare/logo/logo-vicare.png" alt=""
width="140" height="100">
Thymleaf:
<img class="mb-4" th:src="@{/vcare/logo/logo-vicare.png}" alt=""
width="140" height="100">

Because when html rendered, url image is http://hostname/vcare/logo/logo-vicare.png but actual url is: http://hostname/<path_context_tomcat>/vcare/logo/logo-vicare.png

2. Call Ajax in Thymleaf in JS file

jQuery.ajax({
url:  "user/getSecurityCode",
type: "POST",
data: JSON.stringify(requestData),
dataType: "json",
contentType: "application/json; charset=utf-8",
success: function(results) {
alert(results.msg);
}
});

Should:
<script th:inline="javascript"> var contextRoot = /*[[@{/}]]*/ ''; </script>

jQuery.ajax({
url: contextRoot + "user/getSecurityCode",
type: "POST",
data: JSON.stringify(requestData),
dataType: "json",
contentType: "application/json; charset=utf-8",
success: function(results) {
alert(results.msg);
}
});


3. Get Context Path in Java

@Autowired
private ServletContext context;

String contextPath = context.getContextPath();

4. Change logo of tomcat

Add to head of html.
Thymleaf: 
<link rel="shortcut icon" type="image/png" th:href="@{/vcare/logo/logo.png}"/>


is updating...

Setup SSL of NoIP Domain Name (DDNS.NET) on NGINX

January 04, 2024 |


Ref: https://www.digicert.com/kb/csr-ssl-installation/nginx-openssl.htm

1. Generate SSL

- Access to: https://www.digicert.com/easy-csr/openssl.htm 
- Fill the information and click Generate. It will auto-general the command line. 


- Copy and paste into Command Line Prompt.


- Open and copy content of .csr
- Login NOIP > My Services > SSL Certificate > Create > Add CRS > Copy belove and Save. Waiting to validate from Digicert.

- Click Certificate Action > Download :


- Choose CRT Zipped to local PC and unzip.

2. Merge SSL

Windows:

$ copy /b your_domain_name.crt + DigiCertCA.crt bundle.crt

Linux:

$ cat your_domain_name.crt DigiCertCA.crt >> bundle.crt

3. Upload SSL to servers 

4. Config NGINX (nginx.cfg)


[CD/CI] - Jenkins, Cloud, ....

December 18, 2023 |


Jenkins

I. Installation


II. Config and deploy the application via tomcat
Ref: 
https://www.middlewareinventory.com/blog/jenkins-tomcat-deploy-deploying-application-tomcat-using-jenkins/

Step 1: Install Tomcat in your server (CENT OS)
Reference: view here

Step 2: Tomcat Configuration
Open and config user:

<user username="tomcatmanager" password="password" roles="manager-gui"/>
<
user username="deployer" password="password" roles="manager-script"/>

"Tomcatmanager" is used to manage apps in Tomcat GUI.
"deployer" is used for deploying your app via Jenkins.

Step 3: Config your GIT or SVN and Maven installed
In Jenkins GUI, Manage Jenkins > Global Tool Configuration 


Step 4: Install Deploy to Container Plugin
Manager Jenkins > Manag Plugin > Available > Deploy to Container Plugin

Step 5: Create and Configure a Maven Job with Source Code Management (Git or SVN)

New Item > Maven Project > Source code management 


Repository URL: <git_url>
Create and provide Credentials include user name/password.

You should separate many users for git. 

Step 6: Configure the Post-build action and Specify the Tomcat server details
Item > Build > Post Steps > Deploy war/ear to container.


Step 6: Build Jenkins Jobs
Item > Build Now > Check Result


My project screenshot:

Config SVN or GIT:

Build steps: Execute command and copy app release to another place


Another one , I leave default setting

III. Config and deploy the application via tomcat (Jenkins + Spring Boot app + Spring MVC + Gradle + Tomcat 10)

1. Config Jobs
General


Git:


Gradle:
Before: Setup Gradle Global: Dashboard > Manage Jenkins > Tools


If Gradle Build in sub folder project, you must config Root Build Script. If so, Jenkins doesn't build.gradle

Deploy to Tomcat 10:


Jenkins tip

1. Build steps


* Execute Windows batch command => for Windows. You must set cmd.exe in shell execute:
Dashboard > Configure System : Set Shell


* Execute shell => for Linux

Problems:


Solution: Use default maven setting instead of your setting


Run Jenkins Agent in Windows:
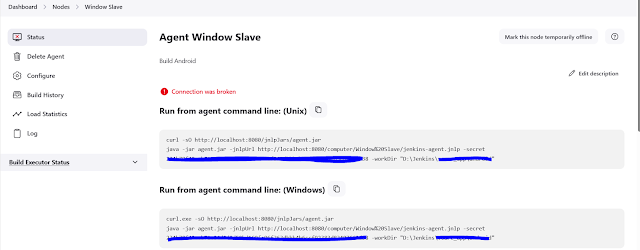
Step1. Run the command below to download agent.jar:
$ curl -sO http://localhost:8080/jnlpJars/agent.jar

Step 2. Run Agent slave in windows:
//Run default Java
$ java" -jar agent.jar -jnlpUrl http://localhost:8080/computer/Window%20Slave/jenkins-agent.jnlp -secret 234b78f48ecb**********663d38 -workDir "D:\Jenkins\app_release"

// Run Specific Java Version
$"C:\Program Files\Java\jdk-11.0.3\bin\java" -jar agent.jar -jnlpUrl http://localhost:8080/computer/Window%20Slave/jenkins-agent.jnlp -secret 234b78f48********f92383d83407663d38 -workDir "D:\Jenkins\app_release"

You can see the guide and secret key here:


Check status
Agent Status in Windows


Cloud Base


1. How to reset password user in Jenkins

Location in Windows: C:\ProgramData\Jenkins\.jenkins

Reset the administrator password

  1. Log in to your Jenkins controller.

  2. Stop the Jenkins process. You may use this command: systemctl stop jenkins.

  3. Edit the Jenkins configuration file (config.xml) inside your jenkins/ or $JENKINS_HOME directory.

  4. Look for useSecurity and change it from true to false manually.

  5. Save your file and close it.

  6. Restart the Jenkins service to apply your changes. You may use this command: systemctl start jenkins. After restarting Jenkins, navigate to your controller and sign in.

  7. On the dashboard, select Manage Jenkins in the navigation pane on the left side of the page.

  8. On the Manage Jenkins page, under the Security section, select Configure Global Security.

  9. Under Security Realm, select Jenkins' own user database from the dropdown menu. Ensure the option Allow users to sign up is unchecked and save your changes. This redirects you to the Manage Jenkins page.

  10. On the Manage Jenkins page, select Users.

  11. You will see a list showing User IDs. Select the User ID that you want to change the password for.

  12. Select Configure using the gear icon or the dropdown menu from the User ID. Locate the Password section to change your password.

After changing the password, you will be able to log into your Jenkins controller again using the same username and the new password that you have just set.


is updating...