[Oracle] - Oracle Database 21

November 24, 2021 |


I. Install Oracle DB 21c In CentOS 8

Ref:
1. Oracle 21c : https://www.oracle.com/database/technologies/oracle21c-windows-downloads.html
2. CentOS v8 : https://www.centos.org/download/

Step 1: Set hostname
$hostnamectl set-hostname oracle.unixcop.local
Step 2: Install Oracle Database preinstall packages.
$dnf install oracle-database-preinstall-21c -y

# If above is cannot install, download rpm in url: 
# https://yum.oracle.com/repo/OracleLinux/OL8/appstream/x86_64/index.html
$dnf localinstall oracle-database-preinstall-21c-1.0-1.el8.x86_64.rpm

Step 3: Update packages.
$ dnf update -y

Step 4: Create the user
$ useradd oracle
$ passwd oracle


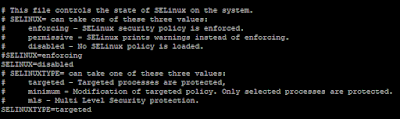
Step 5: Disabled SELinux
$ cat /etc/selinux/config
$ vi /etc/selinux/config

Step 6: Disable Firewall
$ systemctl status firewalld
$ systemctl disable firewalld
Step 7: Make environments
$ mkdir -p /u01/app/oracle
$ mkdir -p /u01/app/oracle/product/21.0.0/dbhome_1
$ mkdir -p /u01/app/oraInventory
$ mkdir -p /u02/oradata
$ chown -R oracle:oinstall /u01 /u02
$ chown -R oracle:oinstall /u01/app/oraInventory
$ chmod -R 775 /u01 /u02
$ mkdir /home/oracle/scripts
$ cat > /home/oracle/scripts/setEnv.sh <<EOF
> # Oracle Settings
> export TMP=/tmp
> export TMPDIR=\$TMP
>
> export ORACLE_HOSTNAME=oracle.unixcop.local
> export ORACLE_UNQNAME=cdb1
> export ORACLE_BASE=/u01/app/oracle
> export ORACLE_HOME=\$ORACLE_BASE/product/21.0.0/dbhome_1
> export ORA_INVENTORY=/u01/app/oraInventory
> export ORACLE_SID=cdb1
> export PBD_NAME=pdb1
> export DATA_DIR=/u02/oradata
>
> export PATH=/usr/sbin:/usr/local/bin:\$PATH
> export PATH=\$ORACLE_HOME/bin:\$PATH
>
> export LB_LIBRRARY_PATH=\$ORACLE_HOME/lib:/lib:/usr/lib
> export CLASSPATH=\$ORACLE_HOME/jlib:\$ORACLE_HOME/rdbms/jlib
> EOF

$ echo ". /home/oracle/scripts/setEnv.sh" >> /home/oracle/.bash_profile

Step 8: Create start/stop oracle db:
$ cat > /home/oracle/scripts/start_all.sh <<EOF
> #!/bin/bash
> . /home/oracle/scripts/setEnv.sh
>
> export ORAENV_ASK=NO
> . oraenv
> export ORAENV_ASK=YES
>
> dbstart \$ORACLE_HOME
> EOF

$ cat > /home/oracle/scripts/stop_all.sh <<EOF
> #!/bin/bash
> . /home/oracle/scripts/setEnv.sh
>
> export ORAENV_ASK=NO
> . oraenv
> export ORAENV_ASK=YES
>
> dbshut \$ORACLE_HOME
> EOF
$ chown -R oracle:oinstall /home/oracle/scripts
$ chmod u+x /home/oracle/scripts/*.sh
Step 9: Upload unzip Oracle DB installter to server follow the path:
/u01/app/oracle/product/21.0.0/dbhome_1

$ ./runInstaller

Note: Switch to user "oracle" in GUI and run this scripts.


* Running RPM packages to Install Oracle Database:


[Aruba] - Setting Aruba IAP 225

September 27, 2021 |


1. Access console of Aruba

Step 1: Open putty

Step 2: Type IP of Aruba 

Step 3: Enter Admin/Password of Admin (same on GUI Login)


2. CLI Command line

Ref: https://www.arubanetworks.com/techdocs/Instant_84_WebHelp/Content/instant-cli/clock-set.htm?Highlight=clock%20set

# show clock
$show clock

#set clock
$ clock set yyyy mm dd hh mm ss

#set NTP server
$ config  (go to config mode )
$ ntp-server <hostname>
$ end (exit config mode)
$commit apply  (apply config)

#check NTP status|
$ show ntp status

#Show NTP debug
$ show ntp debug

#Show time-range
$ show time-range

3. Turn off Broadcast filtering

If all clients cannot broadcast together, we can turn off that:

1. Network > Select Network > Advance Setting > Broadcase filtering : Disable


4. Resolve NTP Time Not Sync in Mikrotik

Description:

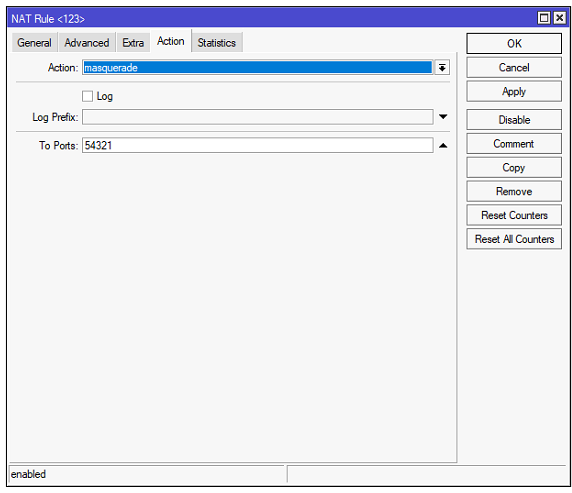
In some areas, the home network infrastructure is still limited, applying policies to each of their Internet users, especially in rural areas and remote areas. Many places block/change NTP ports, specifically UDP port 123.

At that time, your Mikrotik Router will not be able to update and synchronize the time, no matter which NTP Server you set, the status is still in the waiting state as shown above, detecting other unexpected errors. Maybe at this time you think that the Mikrotik device is faulty, you will update, downgrade the firmware for the device, even Re-Install RouterOS for the device but still cannot solve the problem.

Ip > Firewall :


[Java] - Run Java App as a Service in Cent OS

July 30, 2021 |


Run Java App as a Service in Cent OS

References:

  1. https://dzone.com/articles/run-your-java-application-as-a-service-on-ubuntu

Step 1: Create user

  • You should create a user for your service.

Ex:

$ groupadd group1

$ useradd user1 -M -s /bin/nologin -g gtest


Step 2: Create a service

$ vi /etc/systemd/system/your-service.service


Copy/past:

#!/bin/bash

[Unit]

Description=VCS Netty Service

[Service]

User=user1

# The configuration file application.properties should be here:


#change this to your workspace

WorkingDirectory=/home/user1


#path to executable.

#executable is a bash script which calls jar file

ExecStart=/home/user1/run-service


SuccessExitStatus=143

TimeoutStopSec=10

Restart=on-failure

RestartSec=5


[Install]

WantedBy=multi-user.target


Step 3: Create a Bash Script to Call Your Service

$ cd /home/user1

$ vi run-service.sh


#!/usr/bin/bash

/usr/bin/java -jar NETTY_SERVER-0.0.1-SNAPSHOT.jar


$ chmod u+x run-service.sh


Step 4: Start the Service

$ systemctl daemon-reload

$ systemctl enable your-service.service

$ systemctl start your-service

$ systemctl status your-service


Step 4: Check log

$ journalctl -f -u your-service


[React Native] - Realm Database

June 07, 2021 |


REACT NATIVE - REALM DATABASE

Ref:
1. https://docs.mongodb.com/realm-legacy/docs/javascript/latest.html#examples
2. To do list example: https://hellokoding.com/todo-app-with-react-native-realm/

1. Open Realms

//Schema
const PersonSchema = {
  name: 'Person',
  properties: {
    realName:    'string', // required property
    displayName: 'string?', // optional property
    birthday:    {type: 'date', optional: true}, // optional property
  }
};
// Get the default Realm with support for our objects
Realm.open({schema: [Car, Person]})
  .then(realm => {
    // ...use the realm instance here
  })
  .catch(error => {
    // Handle the error here if something went wrong
  });
// Open a realm at another path
Realm.open({
  path: 'anotherRealm.realm',
  schema: [CarSchema]
}).then(/* ... */);


2. Get the current schema version

// Update to to the new schema
Realm.open({schema: [UpdatedPersonSchema], schemaVersion: 1});
//Get current version
const currentVersion = Realm.schemaVersion(Realm.defaultPath);


2. List of properties

realm.write(() => {
  let charlie = realm.create('Person', {
    name: 'Charlie',
    testScores: [100.0]
  });

  // Charlie had an excused absense for the second test and was allowed to skip it
  charlie.testScores.push(null);

  // And then he didn't do so well on the third test
  charlie.testScores.push(70.0);
});


3. Relationship
* To-One Relationship

const PersonSchema = {
  name: 'Person',
  properties: {
    // The following property definitions are equivalent
    car: {type: 'Car'},
    van: 'Car',
  }
};

realm.write(() => {
  const nameString = person.car.name;
  person.car.miles = 1100;

  // create a new Car by setting the property to an object
  // with all of the required fields
  person.van = {make: 'Ford', model: 'Transit'};

  // set both properties to the same car instance
  person.car = person.van;
});

* To-Many Relationships

const PersonSchema = {
  name: 'Person',
  properties: {
    // The following property definitions are equivalent
    cars: {type: 'list', objectType: 'Car'},
    vans: 'Car[]'
  }
}

let carList = person.cars;

// Add new cars to the list
realm.write(() => {
  carList.push({make: 'Honda', model: 'Accord', miles: 100});
  carList.push({make: 'Toyota', model: 'Prius', miles: 200});
});

let secondCar = carList[1].model;  // access using an array index


4. Query

* Get max value in Collection List.
For example: you want to get max of id Person in List. you can do like that

const personList = realm ? realm.objects('Personal') : null;

let idIdx = 0;
if (personList != null && personList.length != 0) {
   idIdx = personList.max('id');
   idIdx++;
}

* Passed para to query
Each subsequent argument is used by the placeholders (e.g. $0, $1, $2, …) in the query.

let person = personList.filtered('id=$0', id);


is updating


[English] - TOEIC

June 03, 2021 |


Tổng hợp ngữ pháp trong TOEIC

I. Từ vựng
1. adhered (v) /əd'hiə/ dính chặt vào, tham gia, giữ vững
2. breached (v)/bri:tʃ/ vi phạm
3. unfavorable (a) Không thuận lợi
4. come as no surpise : chẳng có gì ngạc nhiên
5. come across: tình cờ gặp
6. tobe + about + to : chuẩn bị làm gì
7. A wide variety : Rất nhiều
8. tailored (a) phù hợp


II. Ngữ pháp
1. Đứng sau danh từ
    Prior to + N ": trước đó
    Rather than + V_ing/N : thay vì
    Owning to + N
2. Since/Because + clause
3. With/toward: không đi với ngày tháng

4. Cấu trúc đảo ngữ câu điều kiện (if)

If + S1 + V (hiện tại), S2 + will/may/might/should/can… + V (infinitive)
=> Should + S1 + (not)+ V (hiện tại), S2 + will/may/might/should/can… + V (infinitive)


If + S1 + V (quá khứ), S2 + would/might/could… + V (infinitive)
=> Were + S1 + (not) + O, S2 + would/might/could… + V (infinitive)

If + S1 + had + past participle, S2 + would/might/could… + have + past participle
=> Had + S1 + (not) + past participle, S2 + would/might/could… + have + past participle


5. many/much/very/more
Many: đi với danh từ đếm được
Much: đi với danh từ không đếm được
More: dùng trong câu so sánh
Very: đứng trước tính từ

6. If so : trước dấu "." và sau dấu ","   : Nếu vậy
Ex: They think she may try to phone. If so, someone must stay here.

7. As ... as
N/Adj/Phrase/Clause + as well as + N/Adj/Phrase/Clause.
as well as + V:
ex: John can ride the motorbike as well as ride the car.

N + as well as + N:
ex: My mom as well as my dad, both expected me to graduate.

as far as : theo như
ex: as far as the latest announcement, we will be off 4 consecutive days.

as good as : gần như
ex: as well as no one is in here.

as much as: gần như là, hầu như là, dường như
ex: after studying hard, Mike as well as finished the knowledge.

as long as : miễn là
ex: as soon as I received the test results, I immediately informed my mother.

as early  as: ngay từ khi
ex: I fell in love with Anna as early as I met her.


[Report] - Jasper Report & Oracle BI Publisher

February 04, 2021 |


=========================================================================
I. Jasper Report

1. Require

IReport tool: https://community.jaspersoft.com/project/ireport-designer
JDK 1.7: https://www.oracle.com/java/technologies/javase/javase7-archive-downloads.html

If your PC has already installed many JDK, we can addressed the JDK on IReport Config:
1. Go to C:\Program Files (x86)\Jaspersoft\iReport-5.6.0\etc\ireport.conf
2. Edit this file:
    jdkhome="C:/Program Files/Java/jdk1.7.0_80"


2. Ant compile Jaser Report
Ref: http://jasperreports.sourceforge.net/sample.reference/antcompile/index.html

<target name="compile1"> 
  <mkdir dir="./build/reports"/> 
  <jrc 
    srcdir="./reports"
    destdir="./build/reports"
    tempdir="./build/reports"
    keepjava="true"
    xmlvalidation="true">
   <classpath refid="runClasspath"/>
   <include name="**/*.jrxml"/>
  </jrc>
</target> 
<target name="compile2">
  <mkdir dir="./build/reports"/> 
  <jrc 
    destdir="./build/reports"
    tempdir="./build/reports"
    keepjava="true"
    xmlvalidation="true">
   <src>
    <fileset dir="./reports">
     <include name="**/*.jrxml"/>
    </fileset>
   </src>
   <classpath refid="runClasspath"/>
  </jrc> 
</target> 

3. Jasper Report Java Code

Export Excel Report

/**
 * Export to Excel files.
 * @param response
 * @throws IOException
 * @throws JRException
 */
 public void exportReportToExcel(HttpServletRequest request, HttpServletResponse response) throws IOException, JRException {
  JasperPrint jasperPrint = print();
  String fileName = getExportFileName(types[1]);
  
  response.setContentType("application/vnd.ms-excel; charset=" + Constant.ENCODING);
  response.setHeader("Content-Disposition","attachment;filename=" + fileName);
  
  final OutputStream outputStream = response.getOutputStream();
  
  JRXlsExporter exporter = new JRXlsExporter();
  exporter.setParameter(JRExporterParameter.JASPER_PRINT, jasperPrint);
  exporter.setParameter(JRExporterParameter.OUTPUT_STREAM, outputStream);
  exporter.exportReport();
 }

Export HTML Report

/**
 * Export to HTML files.
 * @param response
 * @throws IOException
 * @throws JRException
 */
 public void exportReportToHTML(HttpServletRequest request, HttpServletResponse response) throws IOException, JRException {
  JasperPrint jasperPrint = print();
  
  response.setContentType("text/html");
  response.setHeader("Content-disposition", "inline");
  
  PrintWriter out = response.getWriter();
  JRHtmlExporter exporter = new JRHtmlExporter();
  request.getSession().setAttribute(ImageServlet.DEFAULT_JASPER_PRINT_LIST_SESSION_ATTRIBUTE, jasperPrint);
  
  exporter.setParameter(JRExporterParameter.JASPER_PRINT, jasperPrint);
  exporter.setParameter(JRExporterParameter.OUTPUT_WRITER, out);
  exporter.setParameter(JRHtmlExporterParameter.IMAGES_URI, "/resources/ireport/html_files/");
  
  exporter.exportReport();
 }

Note: With HTML to view on the web browser, you should have "px" file from IReport. You can found this file in "html_files/px" after compiling your report in IReport Tool.

Export PDF Report

 /**
 * Export to PDF files.
 * @param response
 * @throws IOException
 * @throws JRException
 */
 public void exportReportToPDF(HttpServletResponse response) throws IOException, JRException {
  String fileName = getExportFileName(types[0]);
  JasperPrint jasperPrint = print();

  response.setContentType("application/x-pdf");
  response.setHeader("Content-disposition", "inline; filename=" + fileName);

  final OutputStream outputStream = response.getOutputStream();
  JasperExportManager.exportReportToPdfStream(jasperPrint, outputStream);
 }

4. Jasper Report - Javascript

Download Report by AJAX

 function downloadFile(urlToSend) { 
     var req = new XMLHttpRequest(); 
     req.open("GET", urlToSend, true); 
     req.responseType = "blob"; 
     req.onload = function (event) { 
         var blob = req.response; 
         var fileName = req.getResponseHeader("Header attribute") //if you have the fileName header available 
         var link=document.createElement('a'); 
         link.href=window.URL.createObjectURL(blob); 
         link.download=fileName; 
         link.click(); 
     }; 
 
     req.send(); 
 }


=======================================================================


is updating....

[AWS] - FULL Amazon Web Service

January 26, 2021 |


AWS Cloud Practitioner Essentials
Ref: Get from AWS Training


I. AWS Lamda

Ref:
1. https://aws.amazon.com/lambda/getting-started/
2. https://aws.amazon.com/getting-started/hands-on/run-serverless-code/
3. https://aws.amazon.com/lambda/


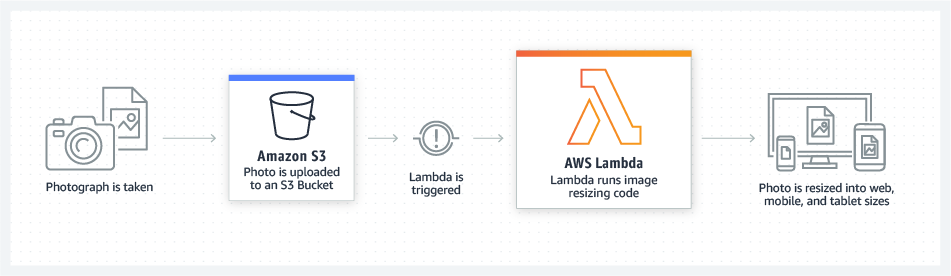
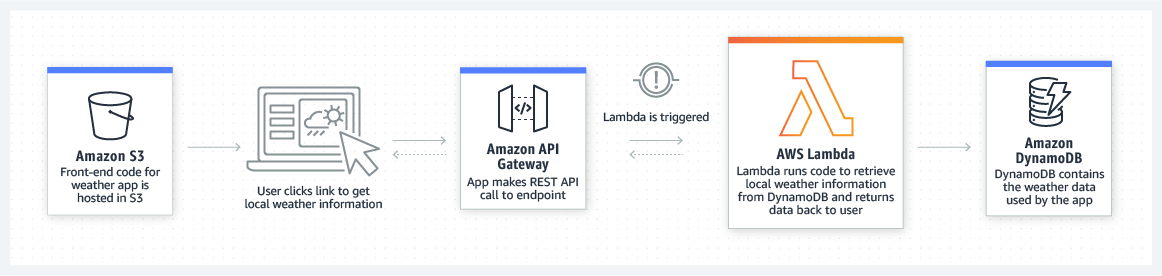
Use case: "AWS Lambda is a serverless compute service that lets you run code without provisioning or managing servers, creating workload-aware cluster scaling logic, maintaining event integrations, or managing runtimes. With Lambda, you can run code for virtually any type of application or backend service - all with zero administration. Just upload your code as a ZIP file or container image, and Lambda automatically and precisely allocates compute execution power and runs your code based on the incoming request or event, for any scale of traffic. You can set up your code to automatically trigger from 140 AWS services or call it directly from any web or mobile app. You can write Lambda functions in your favorite language (Node.js, Python, Go, Java, and more) and use both serverless and container tools, such as AWS SAM or Docker CLI, to build, test, and deploy your functions."

Use case AWS Lamda: https://www.simform.com/serverless-examples-aws-lambda-use-cases/


Real-time file processing

Real-time stream processing


Web application


IoT

Mobile backend


is updating


SSL/TLS - Secure Sockets Layer/Transport Layer Security

December 22, 2020 |


SSL - Secure Socket Layer

Descriptionwiki

Transport Layer Security (TLS), and its now-deprecated predecessor, Secure Sockets Layer (SSL), are cryptographic protocols designed to provide communications security over a computer network. Several versions of the protocols are widely used in applications such as web browsing, email, instant messaging, and voice over IP (VoIP). Websites can use TLS to secure all communications between their servers and web browsers

Versions of SSL/TLS

SSL 1.0 >  SSL 2.0 > SSL 3.0 > TLS 1.0 > TLS 1.1 > TLS 1.2 > TLS 1.3

==========================================================

Setup Environment

1. Keytool in JDK

Windows:

JAVA_HOME=<jdk_dir>

$keytool

==========================================================

Creating the JKS keystore
Ref: Create Keystore

$keytool -genkey -alias <alias_name> -validity <days of valid> -keyalg RSA -keystore keystore
ex: keytool -genkey -alias server -validity 365 -keyalg RSA -keystore keystore

Enter keystore password: strongKeystorePassword

Re-enter new password: strongKeystorePassword

Or

What is your first and last name?

  [Unknown]:  app23.example.com

Note: 
The Common Name is typically composed of Host + Domain Name. 
The Common Name must be the same as the Web address you will be accessing when connecting to a secure site.
For the Endeca Server certificate, you can use the name of the server, including its full domain name. This procedure will use
app23.example.com as the Common Name. After enabling SSL, you can specify the same Common Name with the --host option of the endeca-cmd commands. 

What is the name of your organizational unit?

  [Unknown]:  Apps Department

What is the name of your organization?

  [Unknown]:  example.com

What is the name of your City or Locality?

  [Unknown]:  Cambridge

What is the name of your State or Province?

  [Unknown]:  Massachusetts

What is the two-letter country code for this unit?

  [Unknown]:  US

Is CN=app23.example.com, OU=Apps Department, O=example.com, L=Cambridge, 

ST=Massachusetts, C=US correct?

  [no]:  yes

Enter key password for <server>

        (RETURN if same as keystore password): <RETURN>

When you answer the last prompt, keytool writes the keystore file in the current directory. The keystore contains a private key and a self-signed public key.


Generate a Certificate Signing Request (CSR)

$ keytool -certreq -alias server -keyalg RSA -file endeca.csr -keystore keystore

Send endeca.csr to CA for signing.

Import sign certificate to keystore.

$ keytool -import -file rootCA.pem -keystore keystore -trustcacerts

List all keys on keystore

$ keytool -list -v -keystore path_to_keystore_file

Creating a Self-Signed Certificate

$ keytool -genkeypair -alias alias_name -keyalg RSA -validity #_of_days -keysize 2048 -keystore path_to_keystore_file

Export certificate to another one use

$ keytool -export -alias alias_name -keystore path_to_keystore_file -rfc -file path_to_certificate_file

Installing the Self-Signed Certificate on the Client

$ keytool -importcert -alias alias_name -file path_to_certificate_file -keystore truststore_file

=============================================

Tips:

1. Install Self-Sign for Nginx
openssl req -x509 -nodes -days 365 -newkey rsa:2048 -keyout /vicare/programz/ssl/nginx-selfsigned.key -out /vicare/programz/ssl/nginx-selfsigned.crt

2. Check CA SSL correct or not

Ref: https://www.namecheap.com/support/knowledgebase/article.aspx/9771/2238/apache-error-x509_check_private_keykey-values-mismatch/

$ openssl x509 -in /path/to/certificate.crt -noout -modulus | openssl sha1

$ openssl rsa -in /path/to/private.key -noout -modulus | openssl sha1

Check output between private key/public key same or not.


MySQL/MariaDB - Collection

December 10, 2020 |


MYSQL

====================================================

INSTALLATION

1. CentOS

Ref: https://www.hostinger.com/tutorials/how-to-install-mysql-on-centos-7

 // get update
# yum update

//download repository
 # wget https://dev.mysql.com/get/mysql80-community-release-el7-3.noarch.rpm

// Install
# rpm -Uvh mysql80-community-release-el7-3.noarch.rpm

// Install mysql server
# yum install mysql-server

#Uninstall MySQL
$ sudo service mysql stop
$ sudo killall -KILL mysql mysqld_safe mysqld

$ sudo yum remove mysql-client mysql-server -y

====================================================

MYSQL UNINSTALLATION

====================================================

MARIA DB INSTALLATION (CENTOS)

$ yum install mariadb-server

$ systemctl start mariadb

$ systemctl enable mariadb

$ mysql_secure_installation

MARIA DB INSTALLATION (Amazon Linux 2)

Note: Default Mariadb on this repository is 5.3 which older version. If we want to install higher version, do that:

Enable extras repository: 

$ sudo amazon-linux-extras enable lamp-mariadb10.2-php7.2=latest
$ sudo yum install mariadb mariadb-server

Disabled after installing completed.
$ sudo amazon-linux-extras disable lamp-mariadb10.2-php7.2=latest

Ref: https://stackoverflow.com/questions/63069237/mariadb-installation-on-amazon-linux-2

====================================================

MARIAB UNINSTALLATION

$ rpm -qa | grep mariadb

Remove packages show as above:

rpm -e --nodeps "mariadb-errmsg-10.3.28-1.module_el8.3.0+757+d382997d.x86_64"

rpm -e --nodeps "mariadb-server-utils-10.3.28-1.module_el8.3.0+757+d382997d.x86_64"

rpm -e --nodeps "mariadb-connector-c-config-3.1.11-2.el8_3.noarch"

rpm -e --nodeps "mariadb-connector-c-3.1.11-2.el8_3.x86_64"

rpm -e --nodeps "mariadb-server-10.3.28-1.module_el8.3.0+757+d382997d.x86_64"

rpm -e --nodeps "mariadb-common-10.3.28-1.module_el8.3.0+757+d382997d.x86_64"

rpm -e --nodeps "mariadb-backup-10.3.28-1.module_el8.3.0+757+d382997d.x86_64"

rpm -e --nodeps "mariadb-10.3.28-1.module_el8.3.0+757+d382997d.x86_64"

rpm -e --nodeps "mariadb-gssapi-server-10.3.28-1.module_el8.3.0+757+d382997d.x86_64"

Remove config

rm -f /var/log/mariadb

rm -f /var/log/mariadb/mariadb.log.rpmsave

rm -rf /var/lib/mysql

rm -rf /usr/lib64/mysql

rm -rf /usr/share/mysql

====================================================

MYSQL - COMMAND LINE FOR CHECK

1. Restart/Stop MYSQL service in RELHAT/CENTOS
//Start MySQL
# systemctl start mysqld

//Stop mysql
# systemctl stop mysqld

//Check mysql status
# systemctl status mysqld

 // Change password of root user
# sudo grep 'password' /var/log/mysqld.log  => get tmp password when you first install
# sudo mysql_secure_installation
The existing password for the user account root has expired. Please set a new password.
New password:
Re-enter new password:
Remember: must be restart mysql

//Check current MYSQL version
# mysql -u root -p

 //Reset root password
#sudo mysqld_safe --skip-grant-tables // restart SAFE MODE
#mysql -uroot // connect mySQL

//remove Mysql in CentOS
$ yum remove mysql mysql-server
$ mv /var/lib/mysql /var/lib/mysql_bkup

2. Command line in MYSQL terminal

2.1 Update root password
USE MYSQL;
UPDATE USER SET PASSWORD=PASSWORD(“newpassword”) WHERE USER=’root’;
FLUSH PRIVILEGES;
EXIT

 //Restart MYSQL service after update password

2.2  Show password policy
Ref: https://dev.mysql.com/doc/refman/5.6/en/validate-password-options-variables.html

# SHOW VARIABLES LIKE 'validate_password%';

Result: 

mysql> SHOW VARIABLES LIKE 'validate_password%';

+--------------------------------------+--------+

| Variable_name                        | Value  |

+--------------------------------------+--------+

| validate_password.check_user_name    | ON     |

| validate_password.dictionary_file    |        |

| validate_password.length             | 8      |

| validate_password.mixed_case_count   | 1      |

| validate_password.number_count       | 1      |

| validate_password.policy             | MEDIUM |

| validate_password.special_char_count | 1      |

+--------------------------------------+--------+

7 rows in set (0.00 sec)

We can change this policy by command line below:
# SET GLOBAL validate_password.length = 6;

2.3 Change password

#ALTER USER 'root'@'localhost' IDENTIFIED BY 'password';

2.4 Grant priviliges

#GRANT ALL PRIVILEGE ON <databases>.* TO 'hr_admin'@'%';

#GRANT ALL PRIVILEGE ON <databases>.*TO 'hr'@'localhost';

#GRANT SELECT, INSERT, UPDATE, DELETE, CREATE, DROP, INDEX, ALTER, CREATE TEMPORARY TABLES, CREATE VIEW, EVENT, TRIGGER, SHOW VIEW, CREATE ROUTINE, ALTER ROUTINE, EXECUTE ON  db_hr.* TO 'hr_admin'@'%';

2.5 Check Mariadb Version

$mysql -u root -p

$select @@version;

2.5 Change Mariadb Port

$ netstat -nltp | grep <your_port> // Check your port is exist or not before change

$ vi /etc/my.cnf.d/mariadb-server.cnf

[mysqld]

datadir=/var/lib/mysql

socket=/var/lib/mysql/mysql.sock

log-error=/var/log/mariadb/mariadb.log

pid-file=/run/mariadb/mariadb.pid

port=<enter your port here>

$systemctl restart maridb

- Check port open.

Problems/Solution

1. Fail to start mariadb in CenTos

Error:

========

2022-11-15 11:11:48 0 [Warning] mysqld: GSSAPI plugin : default principal 'mariadb/hrapprd@' not found in keytab

2022-11-15 11:11:48 0 [ERROR] mysqld: Server GSSAPI error (major 851968, minor 2529639093) : gss_acquire_cred failed -Unspecified GSS failure.  Minor code may provide more information. Keytab FILE:/etc/krb5.keytab is nonexistent or empty. 

2022-11-15 11:11:48 0 [ERROR] Plugin 'gssapi' init function returned error.

2022-11-15 11:12:10 0 [Note] InnoDB: Using Linux native AIO

2022-11-15 11:12:10 0 [Note] InnoDB: Mutexes and rw_locks use GCC atomic builtins

2022-11-15 11:12:10 0 [Note] InnoDB: Uses event mutexes

2022-11-15 11:12:10 0 [Note] InnoDB: Compressed tables use zlib 1.2.11

2022-11-15 11:12:10 0 [Note] InnoDB: Number of pools: 1

2022-11-15 11:12:10 0 [Note] InnoDB: Using SSE2 crc32 instructions

2022-11-15 11:12:10 0 [Note] InnoDB: Initializing buffer pool, total size = 128M, instances = 1, chunk size = 128M

2022-11-15 11:12:10 0 [Note] InnoDB: Completed initialization of buffer pool

2022-11-15 11:12:10 0 [Note] InnoDB: If the mysqld execution user is authorized, page cleaner thread priority can be changed. See the man page of setpriority().

2022-11-15 11:12:10 0 [Note] InnoDB: 128 out of 128 rollback segments are active.

2022-11-15 11:12:10 0 [Note] InnoDB: Creating shared tablespace for temporary tables

2022-11-15 11:12:10 0 [Note] InnoDB: Setting file './ibtmp1' size to 12 MB. Physically writing the file full; Please wait ...

2022-11-15 11:12:10 0 [Note] InnoDB: File './ibtmp1' size is now 12 MB.

2022-11-15 11:12:10 0 [Note] InnoDB: 10.3.28 started; log sequence number 1625716; transaction id 20

2022-11-15 11:12:10 0 [Note] Plugin 'FEEDBACK' is disabled.

2022-11-15 11:12:10 0 [Warning] mysqld: GSSAPI plugin : default principal 'mariadb/hrapprd@' not found in keytab

2022-11-15 11:12:10 0 [ERROR] mysqld: Server GSSAPI error (major 851968, minor 2529639093) : gss_acquire_cred failed -Unspecified GSS failure.  Minor code may provide more information. Keytab FILE:/etc/krb5.keytab is nonexistent or empty. 

2022-11-15 11:12:10 0 [ERROR] Plugin 'gssapi' init function returned error.

2022-11-15 11:12:10 0 [Note] InnoDB: Loading buffer pool(s) from /var/lib/mysql/ib_buffer_pool

2022-11-15 11:12:10 0 [Note] InnoDB: Buffer pool(s) load completed at 221115 11:12:10

2022-11-15 11:12:10 0 [Note] Server socket created on IP: '::'.

2022-11-15 11:12:11 0 [Note] Reading of all Master_info entries succeeded

2022-11-15 11:12:11 0 [Note] Added new Master_info '' to hash table

2022-11-15 11:12:11 0 [Note] /usr/libexec/mysqld: ready for connections.

Version: '10.3.28-MariaDB'  socket: '/var/lib/mysql/mysql.sock'  port: 3306  MariaDB Server

=====

Solution:

rm /var/lib/mysql-files /var/lib/mysql-keyring
rm -rf /var/lib/mysql/*

2. No Result in Heidi

Refhttps://www.heidisql.com/forum.php?t=6073
Solution:

This seems to be a popular cosmetic issue in HeidiSQL. You could solve it the hard way:
- exit all heidisql.exe processes
- start regedit.exe
- go to HKEY_CURRENT_USER\Software\HeidiSQL\
- delete value "querymemoheight"
- start heidisql.exe                              

3. Create users

$ CREATE USER 'username'@'host' IDENTIFIED  BY 'password';

4. Error "#1030 - Got error 176 "Read page with wrong checksum" from storage engine Aria" 

Ref:  https://stackoverflow.com/questions/60864367/1030-got-error-176-read-page-with-wrong-checksum-from-storage-engine-aria


- Select the 'mysql' database

- Select all the tables as described in other fixes, but run a 'check tables' instead of a 'repair tables'.

- Check table is broken.

- Back to Step #1 and select this broken table and then repair tables.

 5. Change Data File of Mariadb

$ systemctl stop mariadb
$ mv /var/lib/mysql  /var/lib/mysql.bak // Backup current database
$ rsync -av /var/lib/mysql /new_place //Sync data to new location

$ vi /etc/my.cnf.d/mariadb-server.cnf
datadir=/new_place/mysql

$ vi /etc/my.cnf

[client-server]
socket=/new_place/mysql/mysql.sock
port=3370  // we can change default port also

$vi /etc/selinux/config 

$ SELINUX=enforcing => disabled // turn off SELLinux

6. Show grant of user

SHOW GRANTS FOR 'myuser'@localhost; 

7. Drop user

DROP USER 'vcare'@'%';

8. List of User

select user,host from mysql.user;

9. Backup Mariab DB Tool
-- Full Backup 
mariabackup --backup --target-dir=xxx --user=xxx --password=xxx

-- Single Table Backup
mariadb-dump --user=xxx --password =xxx --lock-tables --databases xxx> /data/backup/db1.sql


[WAS] - Tomcat, Glassfish

August 26, 2020 |

How to installing Hudson on GlassFish server?

We can deploy Hudson on GlassFish, TomCat or JBoss server. This article, I only show install on GlassFish server run on Window.
Prepares:
1. GlassFish. download glassfish
2. Hudson. download hudson

I. GlassFish server

Ref:
1. http://teckchillies.com/install-remove-java-glassfish-as-a-windows-service/
2. https://javaee.github.io/glassfish/doc/5.0/quick-start-guide.pdf

1. Extract glassfish-x.x.zip
2. Go to \glassfish5\bin and open terminal.

start domain
#asadmin start-domain
#asadmin stop-domain

start/stop database
#asadmin start-database
#adadmin stop-database

4. Open web browsers
5. Access to URL to open Glassfish console.
URL localhost:4848

 Make GlasshFish as window service

#create windows service
asadmin create-service --name domain1
#Change service display name
sc config domain1 DisplayName= "GlassFish 4"


II. TOMCAT server

1. Config access tomcat home page from local network
Open apache-tomcat-8.5.61/conf/server.xml and add 'address' attribute as below:

<Connector port="8080" protocol="HTTP/1.1"
  connectionTimeout="20000"
  redirectPort="8443"
  address="0.0.0.0"
/> 
Note: Remember to check firewall on server and client.

2. Config Tomat as service in Centos
Ref:

Step 1: Install OpenJDK
$ sudo yum install java-1.8.0-openjdk
$ ll /usr/lib/jvm/jre   (check jre)

Step 2: Create tomcat user
$ groupadd tomcat
$ useradd -M -s /bin/nologin -g tomcat -d /opt/tomcat tomcat

Step 3: Install Tomcat
- Download tomcat.tar.gz for linux.  (http://tomcat.apache.org/download-80.cgi)
- Upload to /tmp
- Unzip tomcat:
$mkdir /opt/tomcat
$tar xvf apache-tomcat-8*.tar.gz -C /opt/tomcat --strip-components=1

Step 4: Update permission for /opt/tomcat
$cd /opt/tomat
$chgrp -R tomcat /opt/tomcat
$chmod -R g+r conf
$chmod g+x conf
$ chown -R tomcat webapps/ work/ temp/ logs/

Step 5: Make Systemd Unit File
#!/bin/bash
# chkconfig: 345 80 20

[Unit]
Description=Apache Tomcat Web Application Container
After=syslog.target network.target

[Service]
Type=forking

Environment=JAVA_HOME=/usr/lib/jvm/jre
Environment=CATALINA_PID=/opt/tomcat/temp/tomcat.pid
Environment=CATALINA_HOME=/opt/tomcat
Environment=CATALINA_BASE=/opt/tomcat
Environment='CATALINA_OPTS=-Xms512M -Xmx1024M -server -XX:+UseParallelGC'
Environment='JAVA_OPTS=-Djava.awt.headless=true -Djava.security.egd=file:/dev/./urandom'

ExecStart=/opt/tomcat/bin/startup.sh
ExecStop=/bin/kill -15 $MAINPID

User=tomcat
Group=tomcat
UMask=0007
RestartSec=10
Restart=always

[Install]
WantedBy=multi-user.target
$ systemctl daemon-reload
$ systemctl status tomcat
$systemctl enable tomcat

Step 6: Open browser and try to access: localhost:8080

3. Config Tomat as service in Centos
Step 1: Config tomat user
$ vi /opt/tomcat/conf/tomcat-users.xml
<tomcat-users>
<role rolename="manager-gui"/>
<role rolename="manager-script"/>
<role rolename="manager-jmx"/>
<role rolename="manager-status"/>
<user username="admin" password="your password" roles="manager-gui,manager-script,manager-jmx,manager-status"/>
</tomcat-users>

Step 2: Config Manager App, Host Manager App
$vi /opt/tomcat/webapps/manager/META-INF/context.xml
$vi /opt/tomcat/webapps/host-manager/META-INF/context.xml
 Change as below:
- Comment to allow all public IP can access tomcat interface
OR
- Enter allow="your ip"
<Context antiResourceLocking="false" privileged="true" >
  <!--<Valve className="org.apache.catalina.valves.RemoteAddrValve"
         allow="127\.\d+\.\d+\.\d+|::1|0:0:0:0:0:0:0:1" />-->
</Context>

Step 3: Restart Tomcat
$ systemctl restart tomcat

How to Enable SSL tomcat?
$ keytool -genkey -keyalg RSA -noprompt -alias tomcat -dname "CN=localhost, OU=NA, O=NA, L=NA, S=NA, C=NA" -keystore keystore.jks -validity 9999 -storepass changeme -keypass changeme

Config in conf/server.xml, find <Connector port=8443>
certificateKeyAlias="tomcat"
certificateKeystoreFile="/path/to/my/keystore.jks"
certificateKeystorePassword="changeme"

How to redirect HTTP to HTTPS

Edit server.xml


Edit web.xml


====
<security-constraint>
    <web-resource-collection>
        <web-resource-name>vcare-service</web-resource-name>
        <url-pattern>/*</url-pattern>
        <http-method>GET</http-method>
        <http-method>POST</http-method>
    </web-resource-collection>

    <user-data-constraint>
        <transport-guarantee>CONFIDENTIAL</transport-guarantee>
    </user-data-constraint>
</security-constraint>
===
=================================================================
How to restrict access, Tomcat Manager 


#1: Server status  : webapps/manager
#2: Manager App : webapps/manager
#3: Host Manager: /webapps/host-manager


If you want to restrict ip access for each apps:
$ vi /host-manager/META-INFO/context.xml

<Valve className="org.apache.catalina.valves.RemoteAddrValve" allow="x.x.x.x,y.y.y.y,z.z.z.*" />

Allow localhost to access via default port while other addresses are accessible via 1234:
<Valve className="org.apache.catalina.valves.RemoteAddrValve"
   addConnectorPort="true"
   allow="127\.\d+\.\d+\.\d+;\d*|::1;\d*|0:0:0:0:0:0:0:1;\d*|.*;1234"/>


is updating...

[Oracle] - JAVA and another one related JAVA

June 11, 2020 |