How to install Weblogic in RockyOS Minimal (NO GUI)

June 24, 2026 |


How to install Weblogic 12c

Ref: https://www.oracle.com/webfolder/technetwork/tutorials/obe/fmw/wls/12c/12_2_1/01-02-004-InstallWLSGeneric/installwlsgeneric.html

Silent install (recommended for a server)

This is the standard approach on headless Linux servers. You skip the GUI entirely and feed the installer a response file. Run:
java -jar fmw_12.2.1.4.0_wls_lite_generic.jar -silent -responseFile /path/to/response.rsp -invPtrLoc /path/to/oraInst.loc

You need two small files first.

Create oraInst.loc (tells Oracle where to keep its inventory):
====
inventory_loc=/u01/oraInventory inst_group=admin ====

Create wls.rsp (the response file):
====
[ENGINE]

Response File Version=1.0.0.0.0

[GENERIC]
ORACLE_HOME=/u01/Oracle/Middleware/Oracle_Home
INSTALL_TYPE=WebLogic Server
DECLINE_AUTO_UPDATES=true
DECLINE_SECURITY_UPDATES=true
====

Adjust ORACLE_HOME to where you want WebLogic installed (the directory must be empty or not yet exist). Then run:
$ java -jar fmw_12.2.1.4.0_wls_lite_generic.jar -silent -responseFile /home/admin/wls.rsp -invPtrLoc /home/admin/oraInst.loc

When it finishes you'll see "The installation of Oracle Fusion Middleware ... completed successfully.

After the install finishes, there's an important thing to understand: installing WebLogic doesn't give you a running server or a console yet. The installer only puts the binaries on disk. To get the Admin Console web page, you first have to create a domain and start the Admin Server. Here's the full path from where you are now.

Step 1 — Create a domain

The install you just did only laid down the software. Now run the Configuration Wizard to create a domain. Since your server is headless (no display), use the silent mode here too.

The wizard lives in your ORACLE_HOME:
$ cd /u01/Oracle/Middleware/Oracle_Home/oracle_common/common/bin

Create a domain response file, e.g. create_domain.py (WLST script) — this is the headless way:
python
====

readTemplate('/u01/Oracle/Middleware/Oracle_Home/wlserver/common/templates/wls/wls.jar')
cd('/Security/base_domain/User/weblogic')
cmo.setPassword('YourPassword123')
setOption('OverwriteDomain', 'true')
writeDomain('/u01/Oracle/Middleware/Oracle_Home/user_projects/domains/base_domain')
closeTemplate()
exit()
====

Set a password that's at least 8 characters with a number. Then run it:
./wlst.sh create_domain.py

(If you prefer the GUI wizard over X11 forwarding instead, run ./config.sh — but it has the same display requirement as the installer.)

Step 2 — Start the Admin Server

Go into the new domain and start it:
cd /u01/Oracle/Middleware/Oracle_Home/user_projects/domains/base_domain/bin

./startWebLogic.sh

Watch the output. It takes a minute or two. Wait until you see:
<Server state changed to RUNNING>

That line is the signal the console is ready. Note that this command runs in the foreground and ties up your terminal. To keep it running after you log out, start it in the background instead:
nohup ./startWebLogic.sh > server.log 2>&1 &

and watch progress with tail -f server.log.

Step 3 — Open the Admin Console

The console listens on port 7001 by default. In a browser on your own machine:
http://<server-ip>:7001/console

Replace <server-ip> with the server's actual IP address (since the browser is on your laptop, not the server — localhost won't work unless you're browsing from the server itself). Log in with username weblogic and the password you set in Step 1.

If the page doesn't load

Almost always one of these:

The most common cause is the firewall blocking port 7001. Open it:
sudo firewall-cmd --permanent --add-port=7001/tcp

$ sudo firewall-cmd --reload

Other things to check: confirm the server actually reached RUNNING state (Step 2), make sure you're using the right IP (run ip addr on the server to find it), and verify nothing else is using the port with ss -tlnp | grep 7001 on the server.

Once you're in, the Admin Console is where you deploy applications, create data sources, manage servers, and — relevant to your earlier questions — configure SAML 2.0 for the Keycloak integration.

JAVA project with Docker/Kubernet

December 16, 2025 |


Docker with JAVA project


[Java] - Thread A->Z

December 16, 2025 |


Thread


==========================================================================

Thread

Thread Circle:


==============================

Virtual Thread

Ref : 

https://docs.oracle.com/en/java/javase/21/core/virtual-threads.html#GUID-DC4306FC-D6C1-4BCC-AECE-48C32C1A8DAA

Virtual threads are lightweight threads that reduce the effort of writing, maintaining, and debugging high-throughput concurrent applications.

A platform thread is implemented as a thin wrapper around an operating system (OS) thread. A platform thread runs Java code on its underlying OS thread, and the platform thread captures its OS thread for the platform thread's entire lifetime. Consequently, the number of available platform threads is limited to the number of OS threads

Virtual Thread:
- A virtual thread is also an instance of java.lang.Thread..
- A virtual thread isn't tied to a specific OS thread.
- Virtual threads are implemented in a similar way to virtual memory.

Why Use Virtual Threads:
- Use virtual threads in high-throughput concurrent applications, especially those that consist of a great number of concurrent tasks that spend much of their time waiting.
- Virtual threads are not faster threads.


[Security] - List of weakpoint need review/consider to resolve

June 17, 2025 |


There is a list of weaknesses of Linux and Windows servers. Administrators should consider and resolve it.
[Linux Server]
1. Disable Telnet Service on Opertion
- We should consider disable Telnet service because Telnet is not safe and contains many dangerous security risks.

2. System logging Setting According to Policy
- Check log type is write correct file or not. 
In there
auth, authpriv, corn, daemon, kern, lpr, mail, news, syslog, user, uucp and local0 is operation log => write to operation log

alert, crit, deberg, emerg, err, info, notice, warning => message priority log  should write to dev/test log.

$ vi /etc/rsyslog.conf
Ex:
*.alert /var/log/syslog.log
=> *.alert /dev/console

Alert: situation that requires immediate action

3. Change Community String of SNMP
$ vi /etc/snmp/snmpd.conf

Change "public" to another secret string.
Before: com2sec notConfigUser default public
After: com2sec notConfigUser default <your secret string>

4. Remote terminal connection timeout setting
Set timeout for terminal session
//For specific user
$ vi /home/<user>/.bash_profile
TMOUT=900  //second
export TMOUT

//For all user
$ /etc/profile.d/csh.local
set autologout=15 //Minutes

5. Management Crontab Configuration File Permission Are Insufficient
-  Remove other read permission at /etc/at.deny
$ chmod o-r /etc/at.deny
- at.deny is control user using "at" command.

* The 'at' is a command that allows the users to schedule one-time tasks or recurring jobs at a specific time and date. It is mainly useful for automating the system maintenance, backups, software updates, and various administrative tasks. The 'at' command works by following queuing mechanism for the commands to be executed by the system's job scheduler at the specified time.

6. Management C Configuration File Permission Are Insufficient
- Remove other execution in C compiler
$ chmod o-x /usr/bin/gcc  /usr/bin/cc
- If you don't use C compiler, can remove them
$ rm -f /usr/bin/gcc  /usr/bin/cc

7. World Writable file in home
- We must review all permission file in home of user and check world writable.
- World writable mean that other user/anyone can edit the file.

$chmod o-w <file_name>  
$ rm -rf <file_name> // if exist file not used

8. Insufficient owner or permmission for user environment files
 we should review all environment file permission or right owner.
$ cd /home/<user_ name>
$ ls -al  
$ chown <username> <file_name>  // change file owner if incorrect owner
$ chmod o-r,o-w <file_name>  // remove other write/read permission if file have

These user environment files:
-rw-------. 1 hqt  hqt  2008 Jun 18 15:59 .bash_history
-rw-r--r--. 1 hqt  hqt    18 Jan 24  2023 .bash_logout
-rw-r--r--. 1 hqt  hqt   141 Jun 18 16:20 .bash_profile
-rw-r--r--. 1 hqt  hqt   492 Jan 24  2023 .bashrc
-rw-------. 1 hqt  hqt    20 Feb 10 14:15 .lesshst
-rw-------. 1 hqt  hqt  8277 Jun 19 10:20 .viminfo
-rw-r--r--. 1 hqt  hqt   658 May 15  2022 .zshrc
 9

9. Access control and management of system log
- Review all log permission and owner
$ cd /var/log
$ ls -al

Review one by one log file and change owner to "root" and permission file should be 644 (rw-r--r--)
$ chown root <log_file>
$ chmod 644 <log_file>

10. Su command usable group restriction
Check the "wheel" group and the right access user
$vi /etc/group

Require a user to be in the "wheel" group. Uncomment the red one.
$ vi /etc/pam.d/su


11. Cron service usage account limit
We should check the account using cron and the correct usage of cron.
$ vi /etc/cron.allow
$ vi /etc/cron.deny

12. Unnecessary GID without Members Exist
- If there is a group without members, review with the administrator and delete.
$ cat /etc/group
// Check group doesn't exist members and remove it.

13. Unnescessary User exists in Admin  Group
- Delete unnecessary account after checking the current status of registration accounts. 
$ cat /etc/group
Ex: root:x:0:root,test

14. Inferable Account Password Exists
Unsuitable password types
1. Word or combination of words from dictionary
2. Password that is too short in length, or NULL
3. Listing a series the keyboard (Ex: abcd, qwert,...

How to manage passwords:
1. Combine English alphabet, numbers and special characters t create a password of 8 or more  characters that is different from account name
- Minimum 10 characters of 2 or more type below, or minimum 8 character of 3 or more types:
A. English uppercase (26 letters)
B. English lowercase(26 letters)
C. Number ( 10 digits)
D. Special character (32 character)
2. Use a different password for each system
3. Change the password frequently if possible.


15. Set Lockouts for Failed Password Attempts

Limit Password Reuse
$ authselect select sssd with-faillock with-pwhistory
$ vi /etc/security/pwhistory.conf


Lock Accounts After Failed Password Attempts
$ authselect enable-feature with-faillock
$ vi /etc/security/faillock.conf
deny = 3

Set Password Quality Requirements
$ vi /etc/security/pwquality.conf
# The maximum credit for having digits in the new password. If less than 0
# it is the minimum number of digits in the new password.
dcredit = 0 => 8

# The maximum credit for having lowercase characters in the new password.
# If less than 0 it is the minimum number of lowercase characters in the new
# password.
lcredit = 0

Set Password Minimum Length
To specify password length requirements for new accounts, edit the file /etc/login.defs and add or correct the following line
PASS_MIN_LEN    8 => 15

Set Root Account Password Maximum Age
Configure the root account to enforce a 365-day maximum password lifetime restriction by running the following command:
$ sudo chage -M 365 root

Verify Proper Storage and Existence of Password Hashes


==================================================================
[Windows server]
1. Set timeout of RDP and Terminal session
- Should set timeout of each session when user remote to server. Ex: 15-30 min for each session

How to config:
- Config RDP Timeout:
Computer Configuration > Administrative Templates > Windows Components > Remote Desktop Services > Remote Desktop Session Host > Session Time Limits

- Config Terminal Timeout:
The relevant Registry key is typically:
HKEY_LOCAL_MACHINE\SOFTWARE\Policies\Microsoft\Windows NT\Terminal Services

2. Set a timeout for SMB
- Go to Run > secpol.msc (Local Security Policy) > Local Policies > Security Options 
- Find :Microsoft network server: Amount of idle time required before suspending session.
- Set 0 to 15 minutes.

3. Enable Network Access with SAM Account (Security Account Manager)
- Go to Run > secpol.msc (Local Security Policy) > Local Policies > Security Options 
- Find : change Disable to Enable option these item below:
           Network access: Do not allow anonymous enumberation of Sam account
            Network access: Do not allow anonymous enumberation of Sam account & shares

4. Check and stop  unessarry services running
- Run > type Services.msc
- Check all services are running and review which services are unnecessary  and disable them

Ex:
- World Wide Web Publish 
- NetBIOS
- FTP
- Alerter
- Automatic Updates
- Clipbook
- Computer Browser
- Cryptographic services
- DHCP Client
- Distributed link tracking client, servers
- DNS Client
- Error reporting services
- Human Interface device access
- IMAPI CD-Burning COM service
- Messeneger
- Net Meeting remote Desktop Sharing
- Portable Media Serial Number
- Print Spooler
- Remote Registry
- Simple TCP/IP services
- Wireless Zero  Configuration

5. CGI path permission in IIS
- Go to IIS > Sites > Right Click > Edit Permission
- Change permission of CGI path
- Remove Everyone permission, should grant to Admin/System user.

6. Remove Handler Mapping in IIS
- Go to IIS > Sites > Select [Site]
- Select Hanlder Mapping
- Remove path below:  .htr (Web-based password reset), .idc (internet database connector), .stm, .shtm, .shtml, .printer (internet printing), .htw, .ida, .idq (index server)

7. Rename of Administrator account
- Go to Run > secpol.msc (Local Security Policy) > Local Policies > Security Options 
- Find : Account: Rename administrator account 
=> Set another name that is difficult guess 

8. Disable Unnecessary Task Scheduler
- Review and disable the unnecessary task scheduler.

9. Don't display last sign-in 
- Go to Run > secpol.msc (Local Security Policy) > Local Policies > Security Options 
- Find : Account: Interactive logon: Don't display last signed-in 
- Change disable => enable

10. Set ScreenSaver Display Time
- Should set the time to less than 10 minutes.

11. Insufficient access restrictions for security management network services
- Go to Run > secpol.msc (Local Security Policy) > Local Policies > User Rights Assigment
- Find: Access this computer from the network
- Check and review User or User Group that remove unnecessary.
Ex: Remove Everyone user.

12. SNMP Service
- Review and stop SNMP service if don't use in services.msc

13. IIS - set error page 
Should set error page for each error code: 400, 401, 403,...
- IIS > Sites > select [sites] > Error page > Set error page for each status code

14. Allow user authentication local logon
- Go to Run > secpol.msc (Local Security Policy) > Local Policies > User Rights Assigment
- Find: Allow log on locally
- Check and review another User/Group except "Administrator"

15. Security Management System Usage Precautions
- Go to Run > secpol.msc (Local Security Policy) > Local Policies > Security Options
- Find: Interactive logon: Message text for users attempting to log on
- Set a warning message/policy/notice...


is updating....

Eclipse A-Z

February 17, 2025 |


1. "Downloading external resources is disabled." in spring XML

Solution: Window -> Preference -> Maven -> tick the option ('download artifact javadoc')


Apache Kafka

February 07, 2025 |


I. Setup environment


1 - Install Zookeeper
Download Apache Zookeeper : Download

- Upload Zookeeper to /opt
- Unzip installation file:
    $ tar -xzvf apache-zookeeper-3.9.3-bin.tar.gz
- Copy and config file:
    $ cd /bin/conf
    $ cp zoo_sample.cfg zoo.cfg
    $ vi zoo.cfg 


Change dataDir=<path_storage_data>
- Start/Stop ZooKeeper:
$ cd /bin
$ ./zkServer.sh start
$ ./zkServer.sh stop
$ ./zkCli.sh // Connect to Zookeeper server

2. Make Zookeper as Services. (RockyOS 9)
Preapare zookeeper service files:
Ex: zookeeper.service
====================
#!/bin/bash
# chkconfig: 345 80 20

[Unit]
Description=Zookeeper
After=syslog.target network.target

[Service]
Type=forking

ExecStart=/opt/zookeeper/apache-zookeeper-3.9.3-bin/bin/zkServer.sh start
ExecStop=/opt/zookeeper/apache-zookeeper-3.9.3-bin/bin/zkServer.sh stop

User=hqt
Group=hqt
UMask=0007
RestartSec=10
Restart=always

[Install]
WantedBy=multi-user.target
===========================
$  cp /zookeeper.service /usr/lib/systemd/system/
$ systemctl enable zookeeper
$ systemctl daemon-reload
$ systemctl start zookeeper
$ systemctl stop zookeeper
$ systemctl status zookeeper
$chkconfig zookeeper on 

if chkconfig hasn't already existed. Install as below:
$yum install chkconfig

3. Install kafka

- Download kafka: Download here
- Upload to server: /opt/kafka
- Unzip file:
$ tar -xzvf kafka_2.13-3.9.0.tgz
- Start/stop kafka:
$ bin/kafka-server-start.sh config/server.properties
$ bin/kafka-server-stop.sh

4. Make Kafka service
$ vi /usr/lib/systemd/system/kafka.service
#!/bin/bash
# chkconfig: 345 80 20

[Unit]
Description=Kafka Service
After=syslog.target network.target

[Unit]
Requires=zookeeper.service
After=zookeeper.service

[Service]
Type=simple

ExecStart=/bin/sh -c '/opt/kafka/kafka_2.13-3.9.0/bin/kafka-server-start.sh /opt/kafka/kafka_2.13-3.9.0/config/server.properties > /opt/kafka/kafka.log 2>&1'
ExecStop=/opt/kafka/kafka_2.13-3.9.0/bin/kafka-server-stop.sh
Restart=on-abnormal

User=hqt
Group=hqt
UMask=0007
RestartSec=10
Restart=always

[Install]
WantedBy=multi-user.target

$ systemctl enable kafka
$ systemctl stat kafka
$ chkconfig kafka on


II. Kafka knowledge


// Create topic
$ bin/kafka-topics.sh --create --topic quickstart-events --bootstrap-server localhost:9092

//Write something to topic
$ ./kafka-console-producer.sh --topic quickstart-events --bootstrap-server localhost:9092

//Read content of topic
$ ./kafka-console-consumer.sh --topic quickstart-events --from-beginning --bootstrap-server localhost:9092

Write "hello" to the topic:

Read content from the topic:


is updating...


Photoprism

November 23, 2024 |


1.Install Photoprism in Windows

Ref: https://docs.photoprism.app/getting-started/docker-compose/#__tabbed_1_5

- Install Docker

$ curl.exe -o install.bat https://dl.photoprism.app/docker/windows/install.bat

install.bat

- Download compose.xml to local

- Run command below where compose.xml stored.

$ docker compose up -d

$ docker compose stop

- Access photoprim: http://localhost:2342/ 

- Enter default user: admin/insecure (Remember change password after login)


Proxmox

October 27, 2024 |


1. Install Proxmox

Download: https://www.proxmox.com/en/downloads

How to install Proxmox in Virtual Box: https://getlabsdone.com/how-to-install-proxmox-ve-on-virtualbox-step-by-step/


Note: Hard Disk must be VMDK (Virtual Machine Disk) format. Another type can't show GUI, Virtual only show back screen.

Virtual Box command line:
$ vboxmanage list vms
$ VBoxManage modifyvm <Name Virtual Box> --nested-hw-virt on  // Enable Nested VT-x/AMD-V

Install Promox:
- Select Install Proxmox VE (Graphical) 
- Enter Country and timezone


- Enter password & email

- Enter IP address
- Next and Installing...


is updating...

Genymotion Tips

October 01, 2024 |


[Windows]
1. User Account Control Prompt many time when start emulator.

Right click Genymotion in Desktop > Properties > Compatibility > Check Run this program run as Administrator

2. If you can't Drag&Drop file into Emulator, remove Administator.

Mikrotik L2TP / IPsec VPN Server Step by Step configuration

August 29, 2024 |


Ref: 

https://www.cloudhosting.lv/eng/faq/Mikrotik-L2TP-IPsec-VPN-Server-Step-by-Step-configuration

How to enable VPN Server in Mikrotik Router

Step 1: PPP > Interface > L2TP Server


Check Enable & Enter IPSec Secret


Step 2: IP> Pool > Add

Make VPN Pool

Enter Name: VPN
Address      : 192.168.10.100-192.168.10.150

Step 3: PPP > Profile


- Make profile


- Enter Name       : VPN
- Local Addresss  : VPN-Pool
- Remote Address: VPN-Pool

- Rate Limit: 20M/20M

Step 4: PPP > Secret > Add


Enter Name        : test
Password            : 12356
Profile                : VPN
Local Address    : 192.168.10.100
Remote Address    : 192.168.10.101

Step 5: Firewall > Filter Rule (Important step)

- Allow port: 1701, 500, 4500
- Chain: input
- Protocol: udp
- Dst Port: 1701, 500, 4500
- Action: Accept


add more:


Final Result:


These rule must be on top another rules.

If you have any question, please send to me: hoquoctri@live.com

Thanks;


MacOS A->Z

August 27, 2024 |


1. Install HomeBrew
Ref: https://brew.sh/

$ /bin/bash -c "$(curl -fsSL https://raw.githubusercontent.com/Homebrew/install/HEAD/install.sh)"

If MacOS can't found brew command
$ echo "export PATH=/opt/homebrew/bin:$PATH" >> ~/.zshrc

2. Install NVM (Node Version Management)
You can install vary node version in PC and easy switch between node version

$ brew install nvm
$ nvm ls
$ nvm --version
$ nvm install --lts // Install Node latest version
$ nvm install <node_version>
$ nvm use <node version>
$ nvm alias default <node version>

Note: if nvm command not found, add line below to ./zshrc

source $(brew --prefix nvm)/nvm.sh

3. Install Yarn command

$ brew install yarn

4. How to show NPM Scripts in Visual Studio Code

Go to View > Open View > Select NPM Script

5. Install Many Java Verison in Mac OS

$ /usr/libexec/java_home -V // All Java Installed will show here 
6. Install Many Java Version nin MacOS by SDKMAIN 

Ref : https://sdkman.io/usage

// Download SDK
$ curl -s "https://get.sdkman.io" | bash

// Change SDK Man
$ source "$HOME/.sdkman/bin/sdkman-init.sh"

// Check SDK version
$ sdk version

// List packages
$ sdk list  or sdk list <package_name>

// Install Java
$ sdk install java

$ sdk install java 8.0.42

// Set use special version
$ sdk use scala 3.4.2

// Set default  version
$ sdk default scala 3.4.2

// Check Current version
$ sdk current java


React Native on WearOS

August 26, 2024 |


Ref:

https://github.com/fabOnReact/react-native-wear-connectivity?tab=readme-ov-file

I. Create React Native Project on Android

#Remove previous cli
$ npm uninstall -g react-native-cli @react-native-community/cli

#Init project
npx @react-native-community/cli@latest init AwesomeProject

#Edit package.json; Run on Default Port 8081 & Select Device 


#Create Android Simulator

# In Android Simulator > Install Google Watch App/Wear OS App
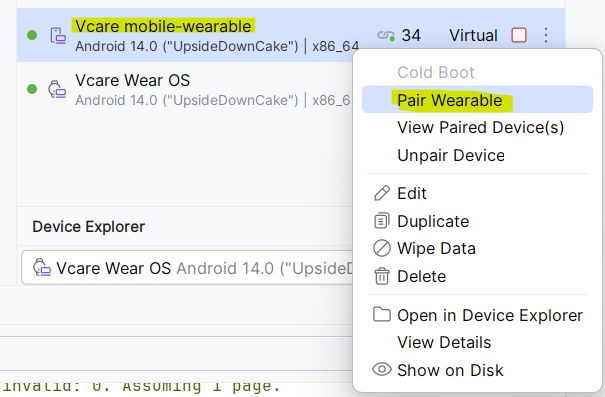
#Paire Wear Devices


- Must open Google Watch app while pair devices and init set up.

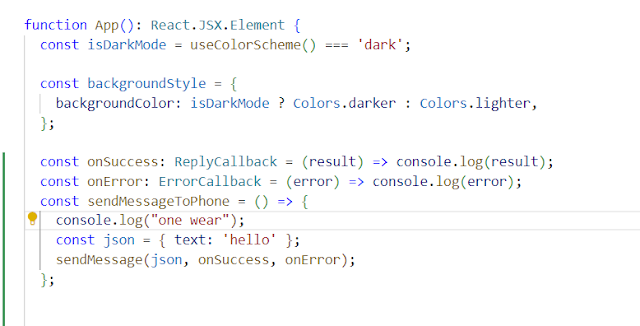
- Code in App.tsx


II. Create React Native Project on WearOS

#Remove previous cli
$ npm uninstall -g react-native-cli @react-native-community/cli

#Init project
npx @react-native-community/cli@latest init AwesomeProject

#Edit package.json , Run on Port 8082 & Select Device 


# Create Wear OS Simulator


- Code in App.tsx


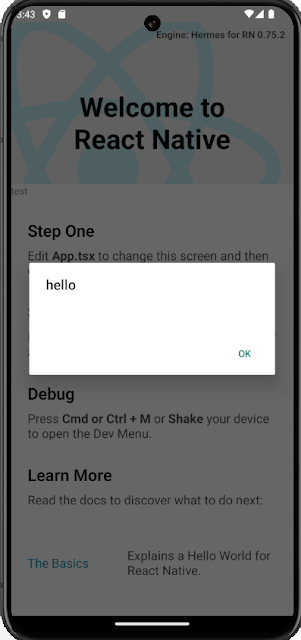
Try test app:

Wear Device:


Android device display Alert from Wear Device: