
[Java] - ORM on Java
November 02, 2023 |

 Home
»
All posts
Home
»
All posts


Ref: https://firebase.google.com/docs/hosting/quickstart
Windows:
$ npm -g install firebase-tools
$ firebase --version
$ firebase login
$ firebase use --add (select your project id)
2. Run Firebase project in local
$ firebase serve --only hosting // run local only
$ firebase serve --host 0.0.0.0 // allow access any source

===========

===========
1. Download images to local
$ docker pull <image_name:tag>
Docker hub: https://hub.docker.com/
2. Run a images
$ docker run -name <unique_container_name> ...
$ docker run --help
3. List container
$ docker ps -a ///list all
$ docker ps //list container is running
4. Start/Stop Container
$ docker stop <container_id/container_name>
$ docker start <container_id/container_name>
5. Remove container/images
$ docker rm <container_id/container_name>
$ docker rmi <img_name>
6. Check container detail
$docker inspect <container_id/container_name>
7. Install docker-compose
Ref: https://www.digitalocean.com/community/tutorials/how-to-install-and-use-docker-compose-on-centos-7
//Check docker-compose version before install. In there docker-compose version is 1.23.2.
// Check latest docker-compose here:
$ sudo curl -L "https://github.com/docker/compose/releases/download/1.23.2/docker-compose-$(uname -s)-$(uname -m)" -o /usr/local/bin/docker-compose
$ sudo chmod +x /usr/local/bin/docker-compose
$ docker-compose --version
Remove docker-compose
#by curl
$ sudo rm /usr/local/bin/docker-compose
| Command | What it does |
|---|---|
docker compose up | Start all services |
docker compose up -d | Start in background (detached) |
docker compose down | Stop and remove containers |
docker compose logs | View output from services |
docker compose ps | List running services |
Problems:
1. Warning: Stop docker.service, but it can still be activated by : docker.socker
Solution:
$ systemctl stop docker.socket
2. Access maridb via docker
$ docker exec -it mariadb10.4 bash // access docker container.
$mysql -u root -p
is updating....

1. https://woocommerce.com/document/woocommerce-rest-api/
2. https://woocommerce.github.io/woocommerce-rest-api-docs/wp-api-v2.html?php#list-all-products
Case study: There are a way used show Product in Mobile App. We can easy manage product without writing backend system.


$hostnamectl set-hostname oracle.unixcop.local
$dnf install oracle-database-preinstall-21c -y

# If above is cannot install, download rpm in url:
# https://yum.oracle.com/repo/OracleLinux/OL8/appstream/x86_64/index.html
$dnf localinstall oracle-database-preinstall-21c-1.0-1.el8.x86_64.rpm
$ dnf update -y
$ useradd oracle
$ passwd oracle
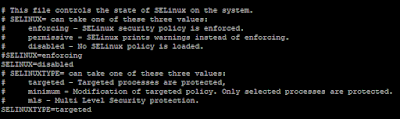
$ cat /etc/selinux/config
$ vi /etc/selinux/config
$ systemctl status firewalld
$ systemctl disable firewalld
$ mkdir -p /u01/app/oracle
$ mkdir -p /u01/app/oracle/product/21.0.0/dbhome_1
$ mkdir -p /u01/app/oraInventory
$ mkdir -p /u02/oradata
$ chown -R oracle:oinstall /u01 /u02
$ chown -R oracle:oinstall /u01/app/oraInventory
$ chmod -R 775 /u01 /u02
$ mkdir /home/oracle/scripts
$ cat > /home/oracle/scripts/setEnv.sh <<EOF
> # Oracle Settings
> export TMP=/tmp
> export TMPDIR=\$TMP
>
> export ORACLE_HOSTNAME=oracle.unixcop.local
> export ORACLE_UNQNAME=cdb1
> export ORACLE_BASE=/u01/app/oracle
> export ORACLE_HOME=\$ORACLE_BASE/product/21.0.0/dbhome_1
> export ORA_INVENTORY=/u01/app/oraInventory
> export ORACLE_SID=cdb1
> export PBD_NAME=pdb1
> export DATA_DIR=/u02/oradata
>
> export PATH=/usr/sbin:/usr/local/bin:\$PATH
> export PATH=\$ORACLE_HOME/bin:\$PATH
>
> export LB_LIBRRARY_PATH=\$ORACLE_HOME/lib:/lib:/usr/lib
> export CLASSPATH=\$ORACLE_HOME/jlib:\$ORACLE_HOME/rdbms/jlib
> EOF

$ echo ". /home/oracle/scripts/setEnv.sh" >> /home/oracle/.bash_profile
$ cat > /home/oracle/scripts/start_all.sh <<EOF
> #!/bin/bash
> . /home/oracle/scripts/setEnv.sh
>
> export ORAENV_ASK=NO
> . oraenv
> export ORAENV_ASK=YES
>
> dbstart \$ORACLE_HOME
> EOF

$ cat > /home/oracle/scripts/stop_all.sh <<EOF
> #!/bin/bash
> . /home/oracle/scripts/setEnv.sh
>
> export ORAENV_ASK=NO
> . oraenv
> export ORAENV_ASK=YES
>
> dbshut \$ORACLE_HOME
> EOF
$ chown -R oracle:oinstall /home/oracle/scripts
$ chmod u+x /home/oracle/scripts/*.sh
$ ./runInstaller

Step 1: Open putty
Step 2: Type IP of Aruba
Step 3: Enter Admin/Password of Admin (same on GUI Login)
2. CLI Command line
# show clock
$show clock
#set clock
$ clock set yyyy mm dd hh mm ss
#set NTP server
$ config (go to config mode )
$ ntp-server <hostname>
$ end (exit config mode)
$commit apply (apply config)
#check NTP status|
$ show ntp status
#Show NTP debug
$ show ntp debug
#Show time-range
$ show time-range
3. Turn off Broadcast filtering
If all clients cannot broadcast together, we can turn off that:
1. Network > Select Network > Advance Setting > Broadcase filtering : Disable

4. Resolve NTP Time Not Sync in Mikrotik
Description:
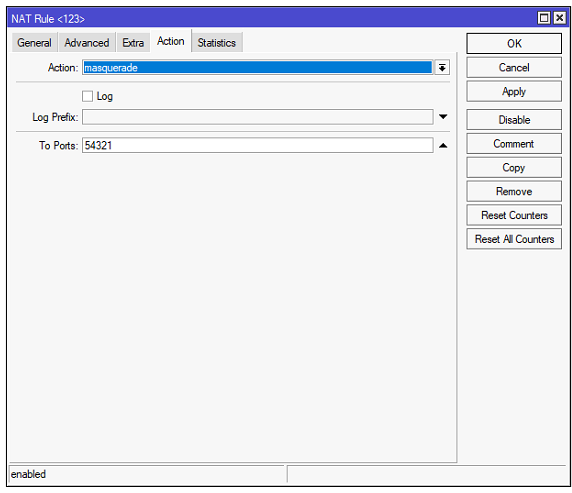
In some areas, the home network infrastructure is still limited, applying policies to each of their Internet users, especially in rural areas and remote areas. Many places block/change NTP ports, specifically UDP port 123.
At that time, your Mikrotik Router will not be able to update and synchronize the time, no matter which NTP Server you set, the status is still in the waiting state as shown above, detecting other unexpected errors. Maybe at this time you think that the Mikrotik device is faulty, you will update, downgrade the firmware for the device, even Re-Install RouterOS for the device but still cannot solve the problem.
Ip > Firewall :


Run Java App as a Service in Cent OS
References:
Step 1: Create user
You should create a user for your service.
Ex:
$ groupadd group1
$ useradd user1 -M -s /bin/nologin -g gtest
Step 2: Create a service
$ vi /etc/systemd/system/your-service.service
Copy/past:
#!/bin/bash
[Unit]
Description=VCS Netty Service
[Service]
User=user1
# The configuration file application.properties should be here:
#change this to your workspace
WorkingDirectory=/home/user1
#path to executable.
#executable is a bash script which calls jar file
ExecStart=/home/user1/run-service
SuccessExitStatus=143
TimeoutStopSec=10
Restart=on-failure
RestartSec=5
[Install]
WantedBy=multi-user.target
Step 3: Create a Bash Script to Call Your Service
$ cd /home/user1
$ vi run-service.sh
#!/usr/bin/bash
/usr/bin/java -jar NETTY_SERVER-0.0.1-SNAPSHOT.jar
$ chmod u+x run-service.sh
Step 4: Start the Service
$ systemctl daemon-reload
$ systemctl enable your-service.service
$ systemctl start your-service
$ systemctl status your-service
Step 4: Check log
$ journalctl -f -u your-service

Ref:
1. https://docs.mongodb.com/realm-legacy/docs/javascript/latest.html#examples
2. To do list example: https://hellokoding.com/todo-app-with-react-native-realm/
1. Open Realms
//Schema const PersonSchema = { name: 'Person',properties: { realName: 'string', // required property displayName: 'string?', // optional property birthday: {type: 'date', optional: true}, // optional property } };// Get the default Realm with support for our objects Realm.open({schema: [Car, Person]}) .then(realm => { // ...use the realm instance here }) .catch(error => { // Handle the error here if something went wrong });// Open a realm at another path Realm.open({ path: 'anotherRealm.realm', schema: [CarSchema] }).then(/* ... */);
2. Get the current schema version
//Get current version const currentVersion = Realm.schemaVersion(Realm.defaultPath);
2. List of properties
realm.write(() => {
  let charlie = realm.create('Person', {
    name: 'Charlie',
    testScores: [100.0]
  });

  // Charlie had an excused absense for the second test and was allowed to skip it
  charlie.testScores.push(null);

  // And then he didn't do so well on the third test
  charlie.testScores.push(70.0);
});
3. Relationship
* To-One Relationship
const PersonSchema = {
  name: 'Person',
  properties: {
    // The following property definitions are equivalent
    car: {type: 'Car'},
    van: 'Car',
  }
};

realm.write(() => {
  const nameString = person.car.name;
  person.car.miles = 1100;

  // create a new Car by setting the property to an object
  // with all of the required fields
  person.van = {make: 'Ford', model: 'Transit'};

  // set both properties to the same car instance
  person.car = person.van;
});
* To-Many Relationships
const PersonSchema = {
  name: 'Person',
  properties: {
    // The following property definitions are equivalent
    cars: {type: 'list', objectType: 'Car'},
    vans: 'Car[]'
  }
}

let carList = person.cars;

// Add new cars to the list
realm.write(() => {
  carList.push({make: 'Honda', model: 'Accord', miles: 100});
  carList.push({make: 'Toyota', model: 'Prius', miles: 200});
});

let secondCar = carList[1].model;  // access using an array index
4. Query
* Get max value in Collection List.
For example: you want to get max of id Person in List. you can do like that
const personList = realm ? realm.objects('Personal') : null;

let idIdx = 0;
if (personList != null && personList.length != 0) {
   idIdx = personList.max('id');
   idIdx++;
}
* Passed para to query
Each subsequent argument is used by the placeholders (e.g. $0, $1, $2, …) in the query.
let person = personList.filtered('id=$0', id);is updating

 Previous Article
