[CD/CI] - Jenkins, Cloud, ....

December 18, 2023 |


Jenkins

I. Installation


II. Config and deploy the application via tomcat
Ref: 
https://www.middlewareinventory.com/blog/jenkins-tomcat-deploy-deploying-application-tomcat-using-jenkins/

Step 1: Install Tomcat in your server (CENT OS)
Reference: view here

Step 2: Tomcat Configuration
Open and config user:

<user username="tomcatmanager" password="password" roles="manager-gui"/>
<
user username="deployer" password="password" roles="manager-script"/>

"Tomcatmanager" is used to manage apps in Tomcat GUI.
"deployer" is used for deploying your app via Jenkins.

Step 3: Config your GIT or SVN and Maven installed
In Jenkins GUI, Manage Jenkins > Global Tool Configuration 


Step 4: Install Deploy to Container Plugin
Manager Jenkins > Manag Plugin > Available > Deploy to Container Plugin

Step 5: Create and Configure a Maven Job with Source Code Management (Git or SVN)

New Item > Maven Project > Source code management 


Repository URL: <git_url>
Create and provide Credentials include user name/password.

You should separate many users for git. 

Step 6: Configure the Post-build action and Specify the Tomcat server details
Item > Build > Post Steps > Deploy war/ear to container.


Step 6: Build Jenkins Jobs
Item > Build Now > Check Result


My project screenshot:

Config SVN or GIT:

Build steps: Execute command and copy app release to another place


Another one , I leave default setting

III. Config and deploy the application via tomcat (Jenkins + Spring Boot app + Spring MVC + Gradle + Tomcat 10)

1. Config Jobs
General


Git:


Gradle:
Before: Setup Gradle Global: Dashboard > Manage Jenkins > Tools


If Gradle Build in sub folder project, you must config Root Build Script. If so, Jenkins doesn't build.gradle

Deploy to Tomcat 10:


Jenkins tip

1. Build steps


* Execute Windows batch command => for Windows. You must set cmd.exe in shell execute:
Dashboard > Configure System : Set Shell


* Execute shell => for Linux

Problems:


Solution: Use default maven setting instead of your setting


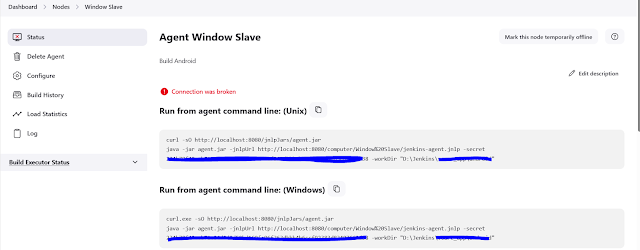
Run Jenkins Agent in Windows:
Step1. Run the command below to download agent.jar:
$ curl -sO http://localhost:8080/jnlpJars/agent.jar

Step 2. Run Agent slave in windows:
//Run default Java
$ java" -jar agent.jar -jnlpUrl http://localhost:8080/computer/Window%20Slave/jenkins-agent.jnlp -secret 234b78f48ecb**********663d38 -workDir "D:\Jenkins\app_release"

// Run Specific Java Version
$"C:\Program Files\Java\jdk-11.0.3\bin\java" -jar agent.jar -jnlpUrl http://localhost:8080/computer/Window%20Slave/jenkins-agent.jnlp -secret 234b78f48********f92383d83407663d38 -workDir "D:\Jenkins\app_release"

You can see the guide and secret key here:


Check status
Agent Status in Windows


Cloud Base


1. How to reset password user in Jenkins

Location in Windows: C:\ProgramData\Jenkins\.jenkins

Reset the administrator password

  1. Log in to your Jenkins controller.

  2. Stop the Jenkins process. You may use this command: systemctl stop jenkins.

  3. Edit the Jenkins configuration file (config.xml) inside your jenkins/ or $JENKINS_HOME directory.

  4. Look for useSecurity and change it from true to false manually.

  5. Save your file and close it.

  6. Restart the Jenkins service to apply your changes. You may use this command: systemctl start jenkins. After restarting Jenkins, navigate to your controller and sign in.

  7. On the dashboard, select Manage Jenkins in the navigation pane on the left side of the page.

  8. On the Manage Jenkins page, under the Security section, select Configure Global Security.

  9. Under Security Realm, select Jenkins' own user database from the dropdown menu. Ensure the option Allow users to sign up is unchecked and save your changes. This redirects you to the Manage Jenkins page.

  10. On the Manage Jenkins page, select Users.

  11. You will see a list showing User IDs. Select the User ID that you want to change the password for.

  12. Select Configure using the gear icon or the dropdown menu from the User ID. Locate the Password section to change your password.

After changing the password, you will be able to log into your Jenkins controller again using the same username and the new password that you have just set.


is updating...


[Java] - ORM on Java

November 02, 2023 |


Android Studio A->Z

October 05, 2023 |


1 Android Simulation graphic problems
Problems:
- Device display problems
- Device run slow and crash.

Solution:
Change Emulate graphic from Automatic to another graphic.
-  Devices > Click ... icon > Show on Disk > config.ini and edit:
hw.gpu.enabled=yes
hw.gpu.mode=software


[Wordpress] - Install wordpress on CentOS

April 04, 2023 |


How to install WordPress in CentOS and config NO-IP for your website

Firebase

February 17, 2023 |


1. How to install firebase CLI in windows

Ref: https://firebase.google.com/docs/hosting/quickstart

Windows:
$ npm -g install firebase-tools
$ firebase --version
$ firebase login
$ firebase use --add (select your project id)

2. Run Firebase project in local
$ firebase serve --only hosting // run local only
$ firebase serve --host 0.0.0.0 // allow access any source

Docker

October 25, 2022 |


Docker

===========


===========

1. Download images to local

$ docker pull <image_name:tag>

Docker hub: https://hub.docker.com/ 

2. Run a images
$ docker run -name <unique_container_name>  ...
$ docker run --help

3. List container

$ docker ps -a ///list all
$ docker ps //list container is running

4. Start/Stop Container

$ docker stop <container_id/container_name>
$ docker start <container_id/container_name>

5. Remove container/images

$ docker rm <container_id/container_name>
$ docker rmi <img_name>

6. Check container detail

$docker inspect <container_id/container_name>

7.  Install docker-compose

Ref: https://www.digitalocean.com/community/tutorials/how-to-install-and-use-docker-compose-on-centos-7

//Check docker-compose version before install. In there docker-compose version is 1.23.2. 
// Check latest docker-compose here

$ sudo curl -L "https://github.com/docker/compose/releases/download/1.23.2/docker-compose-$(uname -s)-$(uname -m)" -o /usr/local/bin/docker-compose

$ sudo chmod +x /usr/local/bin/docker-compose
$ docker-compose --version

Remove docker-compose
#by curl
$ sudo rm /usr/local/bin/docker-compose

#by yum, apt-get
$ sudo apt-get remove docker-compose
$ sudo yum remove docker-compose

#by pip
$ pip uninstall docker-compose
=======================

Create Volume
$ docker volume create <volume_name>

=======================
DOCKER Compose
Docker Compose is a tool for defining and running multi-container Docker applications.
 Instead of managing each container individually with long docker run commands, you describe your entire application stack in a single YAML file (docker-compose.yml), then spin everything up with one command.

A simple example docker-compose.yml:
services:
  web:
    image: nginx
    ports:
      - "80:80"

  db:
    image: postgres
    environment:
      POSTGRES_PASSWORD: secret

  cache:
    image: redis

Key things it handles for you:

Networking — services can reach each other by name (e.g., your app can connect to db:5432)
Environment variables — easily inject config per service
Volumes — persist or share data between containers and your host
Build — can build images from a Dockerfile as part of the process
Dependencies — depends_on lets you control startup order


CommandWhat it does
docker compose upStart all services
docker compose up -dStart in background (detached)
docker compose downStop and remove containers
docker compose logsView output from services
docker compose psList running services
=======================

Stop all docker container
$ docker stop $(docker ps -q)

Remove all container
$ docker rm $(docker ps -aq)

Remove all image on container
$ docker rmi $(docker images -q)

Problems:

1. Warning: Stop docker.service, but it can still be activated by : docker.socker

Solution:

$ systemctl stop docker.socket


2. Access maridb via docker

$ docker exec -it mariadb10.4 bash // access docker container.

$mysql -u root -p

is updating....


[Wordpress] - WooCommerce Plugin

February 25, 2022 |


Ref:

1. https://woocommerce.com/document/woocommerce-rest-api/
2. https://woocommerce.github.io/woocommerce-rest-api-docs/wp-api-v2.html?php#list-all-products


Case study: There are a way used show Product in Mobile App. We can easy manage product without writing backend system.

[Microsoft Word] - Tips

December 23, 2021 |


I. Không thể Zoom Tài Liệu


Nguyên nhân: Bạn đang dùng chế độ view Side By Side
Cách khắc phục:
Menu > View > Chọn Vertical


II. Cách đánh số thứ tự cho từng trang trong word

Cách 1: Đánh số thứ tự cho toàn bộ văn bản
- Chọn Insert > Page Number


Top of page: Chèn phía trên trang
Bottom of page: Chèn phía dưới trang
- Click vào là chọn nơi bạn cần đánh dấu

Cách 2: Đánh số trang cho vị trí bất kì
- Để dánh số trang bất kì, bạn cần chia word thành nhiều Section khác nhau để đánh số. Ví dụ bạn muốn đánh dấu trang số 2 từ 1 đến cuối trang, trang bìa thì bạn bỏ không đánh dấu.
- Bạn chia trang bìa là section 1, và trang thứ 2 trở đi là section 2.
Bạn làm như sau:
- Trỏ chuột vào trang thứ 2 hoặc bất kì trang nào bạn muốn để bắt đầu section #2.
- Bạn vào Layout > Break > Continous


- Lúc này tài liệu bạn đã chia thành 2 section.
- Vào Insert > Page Number > Format Page Number > Chọn Start at: 1

- Sau đó bạn vào trang bìa > Double Click vào Footer > xóa số tự của trang đi.


[Oracle] - Oracle Database 21

November 24, 2021 |


I. Install Oracle DB 21c In CentOS 8

Ref:
1. Oracle 21c : https://www.oracle.com/database/technologies/oracle21c-windows-downloads.html
2. CentOS v8 : https://www.centos.org/download/

Step 1: Set hostname
$hostnamectl set-hostname oracle.unixcop.local
Step 2: Install Oracle Database preinstall packages.
$dnf install oracle-database-preinstall-21c -y

# If above is cannot install, download rpm in url: 
# https://yum.oracle.com/repo/OracleLinux/OL8/appstream/x86_64/index.html
$dnf localinstall oracle-database-preinstall-21c-1.0-1.el8.x86_64.rpm

Step 3: Update packages.
$ dnf update -y

Step 4: Create the user
$ useradd oracle
$ passwd oracle


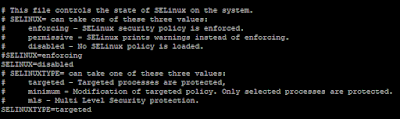
Step 5: Disabled SELinux
$ cat /etc/selinux/config
$ vi /etc/selinux/config

Step 6: Disable Firewall
$ systemctl status firewalld
$ systemctl disable firewalld
Step 7: Make environments
$ mkdir -p /u01/app/oracle
$ mkdir -p /u01/app/oracle/product/21.0.0/dbhome_1
$ mkdir -p /u01/app/oraInventory
$ mkdir -p /u02/oradata
$ chown -R oracle:oinstall /u01 /u02
$ chown -R oracle:oinstall /u01/app/oraInventory
$ chmod -R 775 /u01 /u02
$ mkdir /home/oracle/scripts
$ cat > /home/oracle/scripts/setEnv.sh <<EOF
> # Oracle Settings
> export TMP=/tmp
> export TMPDIR=\$TMP
>
> export ORACLE_HOSTNAME=oracle.unixcop.local
> export ORACLE_UNQNAME=cdb1
> export ORACLE_BASE=/u01/app/oracle
> export ORACLE_HOME=\$ORACLE_BASE/product/21.0.0/dbhome_1
> export ORA_INVENTORY=/u01/app/oraInventory
> export ORACLE_SID=cdb1
> export PBD_NAME=pdb1
> export DATA_DIR=/u02/oradata
>
> export PATH=/usr/sbin:/usr/local/bin:\$PATH
> export PATH=\$ORACLE_HOME/bin:\$PATH
>
> export LB_LIBRRARY_PATH=\$ORACLE_HOME/lib:/lib:/usr/lib
> export CLASSPATH=\$ORACLE_HOME/jlib:\$ORACLE_HOME/rdbms/jlib
> EOF

$ echo ". /home/oracle/scripts/setEnv.sh" >> /home/oracle/.bash_profile

Step 8: Create start/stop oracle db:
$ cat > /home/oracle/scripts/start_all.sh <<EOF
> #!/bin/bash
> . /home/oracle/scripts/setEnv.sh
>
> export ORAENV_ASK=NO
> . oraenv
> export ORAENV_ASK=YES
>
> dbstart \$ORACLE_HOME
> EOF

$ cat > /home/oracle/scripts/stop_all.sh <<EOF
> #!/bin/bash
> . /home/oracle/scripts/setEnv.sh
>
> export ORAENV_ASK=NO
> . oraenv
> export ORAENV_ASK=YES
>
> dbshut \$ORACLE_HOME
> EOF
$ chown -R oracle:oinstall /home/oracle/scripts
$ chmod u+x /home/oracle/scripts/*.sh
Step 9: Upload unzip Oracle DB installter to server follow the path:
/u01/app/oracle/product/21.0.0/dbhome_1

$ ./runInstaller

Note: Switch to user "oracle" in GUI and run this scripts.


* Running RPM packages to Install Oracle Database:


[Aruba] - Setting Aruba IAP 225

September 27, 2021 |


1. Access console of Aruba

Step 1: Open putty

Step 2: Type IP of Aruba 

Step 3: Enter Admin/Password of Admin (same on GUI Login)


2. CLI Command line

Ref: https://www.arubanetworks.com/techdocs/Instant_84_WebHelp/Content/instant-cli/clock-set.htm?Highlight=clock%20set

# show clock
$show clock

#set clock
$ clock set yyyy mm dd hh mm ss

#set NTP server
$ config  (go to config mode )
$ ntp-server <hostname>
$ end (exit config mode)
$commit apply  (apply config)

#check NTP status|
$ show ntp status

#Show NTP debug
$ show ntp debug

#Show time-range
$ show time-range

3. Turn off Broadcast filtering

If all clients cannot broadcast together, we can turn off that:

1. Network > Select Network > Advance Setting > Broadcase filtering : Disable


4. Resolve NTP Time Not Sync in Mikrotik

Description:

In some areas, the home network infrastructure is still limited, applying policies to each of their Internet users, especially in rural areas and remote areas. Many places block/change NTP ports, specifically UDP port 123.
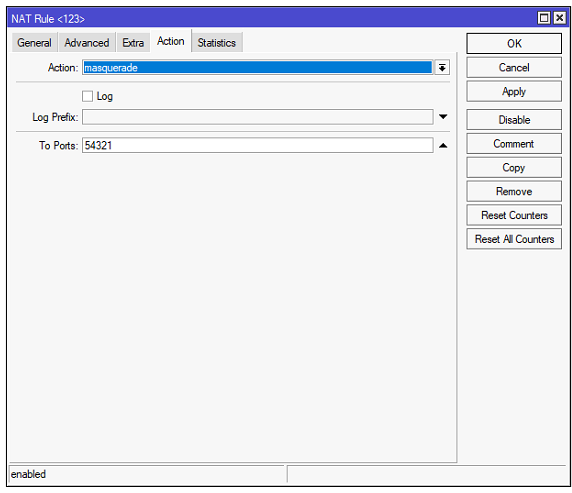
At that time, your Mikrotik Router will not be able to update and synchronize the time, no matter which NTP Server you set, the status is still in the waiting state as shown above, detecting other unexpected errors. Maybe at this time you think that the Mikrotik device is faulty, you will update, downgrade the firmware for the device, even Re-Install RouterOS for the device but still cannot solve the problem.

Ip > Firewall :


[Java] - Run Java App as a Service in Cent OS

July 30, 2021 |


Run Java App as a Service in Cent OS

References:

  1. https://dzone.com/articles/run-your-java-application-as-a-service-on-ubuntu

Step 1: Create user

  • You should create a user for your service.

Ex:

$ groupadd group1

$ useradd user1 -M -s /bin/nologin -g gtest


Step 2: Create a service

$ vi /etc/systemd/system/your-service.service


Copy/past:

#!/bin/bash

[Unit]

Description=VCS Netty Service

[Service]

User=user1

# The configuration file application.properties should be here:


#change this to your workspace

WorkingDirectory=/home/user1


#path to executable.

#executable is a bash script which calls jar file

ExecStart=/home/user1/run-service


SuccessExitStatus=143

TimeoutStopSec=10

Restart=on-failure

RestartSec=5


[Install]

WantedBy=multi-user.target


Step 3: Create a Bash Script to Call Your Service

$ cd /home/user1

$ vi run-service.sh


#!/usr/bin/bash

/usr/bin/java -jar NETTY_SERVER-0.0.1-SNAPSHOT.jar


$ chmod u+x run-service.sh


Step 4: Start the Service

$ systemctl daemon-reload

$ systemctl enable your-service.service

$ systemctl start your-service

$ systemctl status your-service


Step 4: Check log

$ journalctl -f -u your-service