Jenkins
I. Installation
II. Config and deploy the application via tomcat
Ref:
https://www.middlewareinventory.com/blog/jenkins-tomcat-deploy-deploying-application-tomcat-using-jenkins/
Step 1: Install Tomcat in your server (CENT OS)
Step 2: Tomcat Configuration
Open and config user:
<user username="tomcatmanager" password="password" roles="manager-gui"/>
<user username="deployer" password="password" roles="manager-script"/>
"Tomcatmanager" is used to manage apps in Tomcat GUI.
"deployer" is used for deploying your app via Jenkins.
Step 3: Config your GIT or SVN and Maven installed
In Jenkins GUI, Manage Jenkins > Global Tool Configuration
Step 4: Install Deploy to Container Plugin
Manager Jenkins > Manag Plugin > Available > Deploy to Container Plugin
Step 5: Create and Configure a Maven Job with Source Code Management (Git or SVN)
New Item > Maven Project > Source code management
Repository URL: <git_url>
Create and provide Credentials include user name/password.
You should separate many users for git.
Step 6: Configure the Post-build action and Specify the Tomcat server details
Item > Build > Post Steps > Deploy war/ear to container.
Step 6: Build Jenkins JobsItem > Build Now > Check Result
II. React Native — Automated build with Jenkins tool
My project screenshot:
Config SVN or GIT:
Build steps: Execute command and copy app release to another place
Another one , I leave default setting
III. Config and deploy the application via tomcat (Jenkins + Spring Boot app + Spring MVC + Gradle + Tomcat 10)
1. Config Jobs
General
Git:
Before: Setup Gradle Global: Dashboard > Manage Jenkins > Tools
If Gradle Build in sub folder project, you must config Root Build Script. If so, Jenkins doesn't build.gradle
Deploy to Tomcat 10:
Jenkins tip
1. Build steps
* Execute Windows batch command => for Windows. You must set cmd.exe in shell execute:
Dashboard > Configure System : Set Shell
* Execute shell => for Linux
Problems:
Solution: Use default maven setting instead of your setting
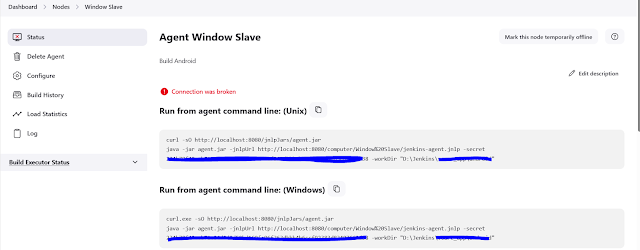
Run Jenkins Agent in Windows: Step1. Run the command below to download agent.jar:
$ curl -sO http://localhost:8080/jnlpJars/agent.jar
Step 2. Run Agent slave in windows:
//Run default Java
$ java" -jar agent.jar -jnlpUrl http://localhost:8080/computer/Window%20Slave/jenkins-agent.jnlp -secret 234b78f48ecb**********663d38 -workDir "D:\Jenkins\app_release"
// Run Specific Java Version
$"C:\Program Files\Java\jdk-11.0.3\bin\java" -jar agent.jar -jnlpUrl http://localhost:8080/computer/Window%20Slave/jenkins-agent.jnlp -secret 234b78f48********f92383d83407663d38 -workDir "D:\Jenkins\app_release"
You can see the guide and secret key here:
Check status
Agent Status in Windows
Cloud Base
1. How to reset password user in Jenkins
Location in Windows: C:\ProgramData\Jenkins\.jenkins
Reset the administrator password
Log in to your Jenkins controller.
Stop the Jenkins process. You may use this command: systemctl stop jenkins.
Edit the Jenkins configuration file (config.xml) inside your jenkins/ or $JENKINS_HOME directory.
Look for useSecurity and change it from true to false manually.
Save your file and close it.
Restart the Jenkins service to apply your changes. You may use this command: systemctl start jenkins. After restarting Jenkins, navigate to your controller and sign in.
On the dashboard, select Manage Jenkins in the navigation pane on the left side of the page.
On the Manage Jenkins page, under the Security section, select Configure Global Security.
Under Security Realm, select Jenkins' own user database from the dropdown menu. Ensure the option Allow users to sign up is unchecked and save your changes. This redirects you to the Manage Jenkins page.
On the Manage Jenkins page, select Users.
You will see a list showing User IDs. Select the User ID that you want to change the password for.
Select Configure using the gear icon or the dropdown menu from the User ID. Locate the Password section to change your password.
After changing the password, you will be able to log into your Jenkins controller again using the same username and the new password that you have just set.
is updating...


 Home
Home


 Previous Article
